
Ödev ve Sınav Hazırlama
Sayfa bölgelerini işaretleme
Sihirbazın üçüncü adımı, taslak üzerindeki her bir alanın hangi amaca hizmet ettiğini belirlemenizdir. Sistem üç tür bölge tanır: Kimlik (öğrencinin adının yazılacağı yer), Soru (sorunun metni) ve Cevap (öğrencinin yazacağı boşluk).
Neden bölge işaretliyoruz?
Bölgeleri işaretlemek üç amaca hizmet eder:
- Kimlik bölgesi, öğrenci kağıtları yüklendiğinde her sayfayı doğru öğrenciye otomatik eşleştirmek için kullanılır.
- Soru bölgeleri, AI'a hangi sorunun nerede olduğunu söyler; öğrenci kağıtlarını sayfa sayfa okuduğunda hangi cevabın hangi soruya ait olduğunu bilir.
- Cevap bölgeleri, sadece o alandaki yazıların değerlendirilmesini garanti eder; başka yere yapılmış notlar değerlendirmeyi karıştırmaz.
En az bir kimlik bölgesi gerekli
Bölgeler işleniyor
Soruları onayladıktan sonra otomatik olarak Adım 3'e geçersiniz. Sistem önce taslak üzerinde olası bölgeleri bulmaya çalışır; bu birkaç dakika sürebilir.
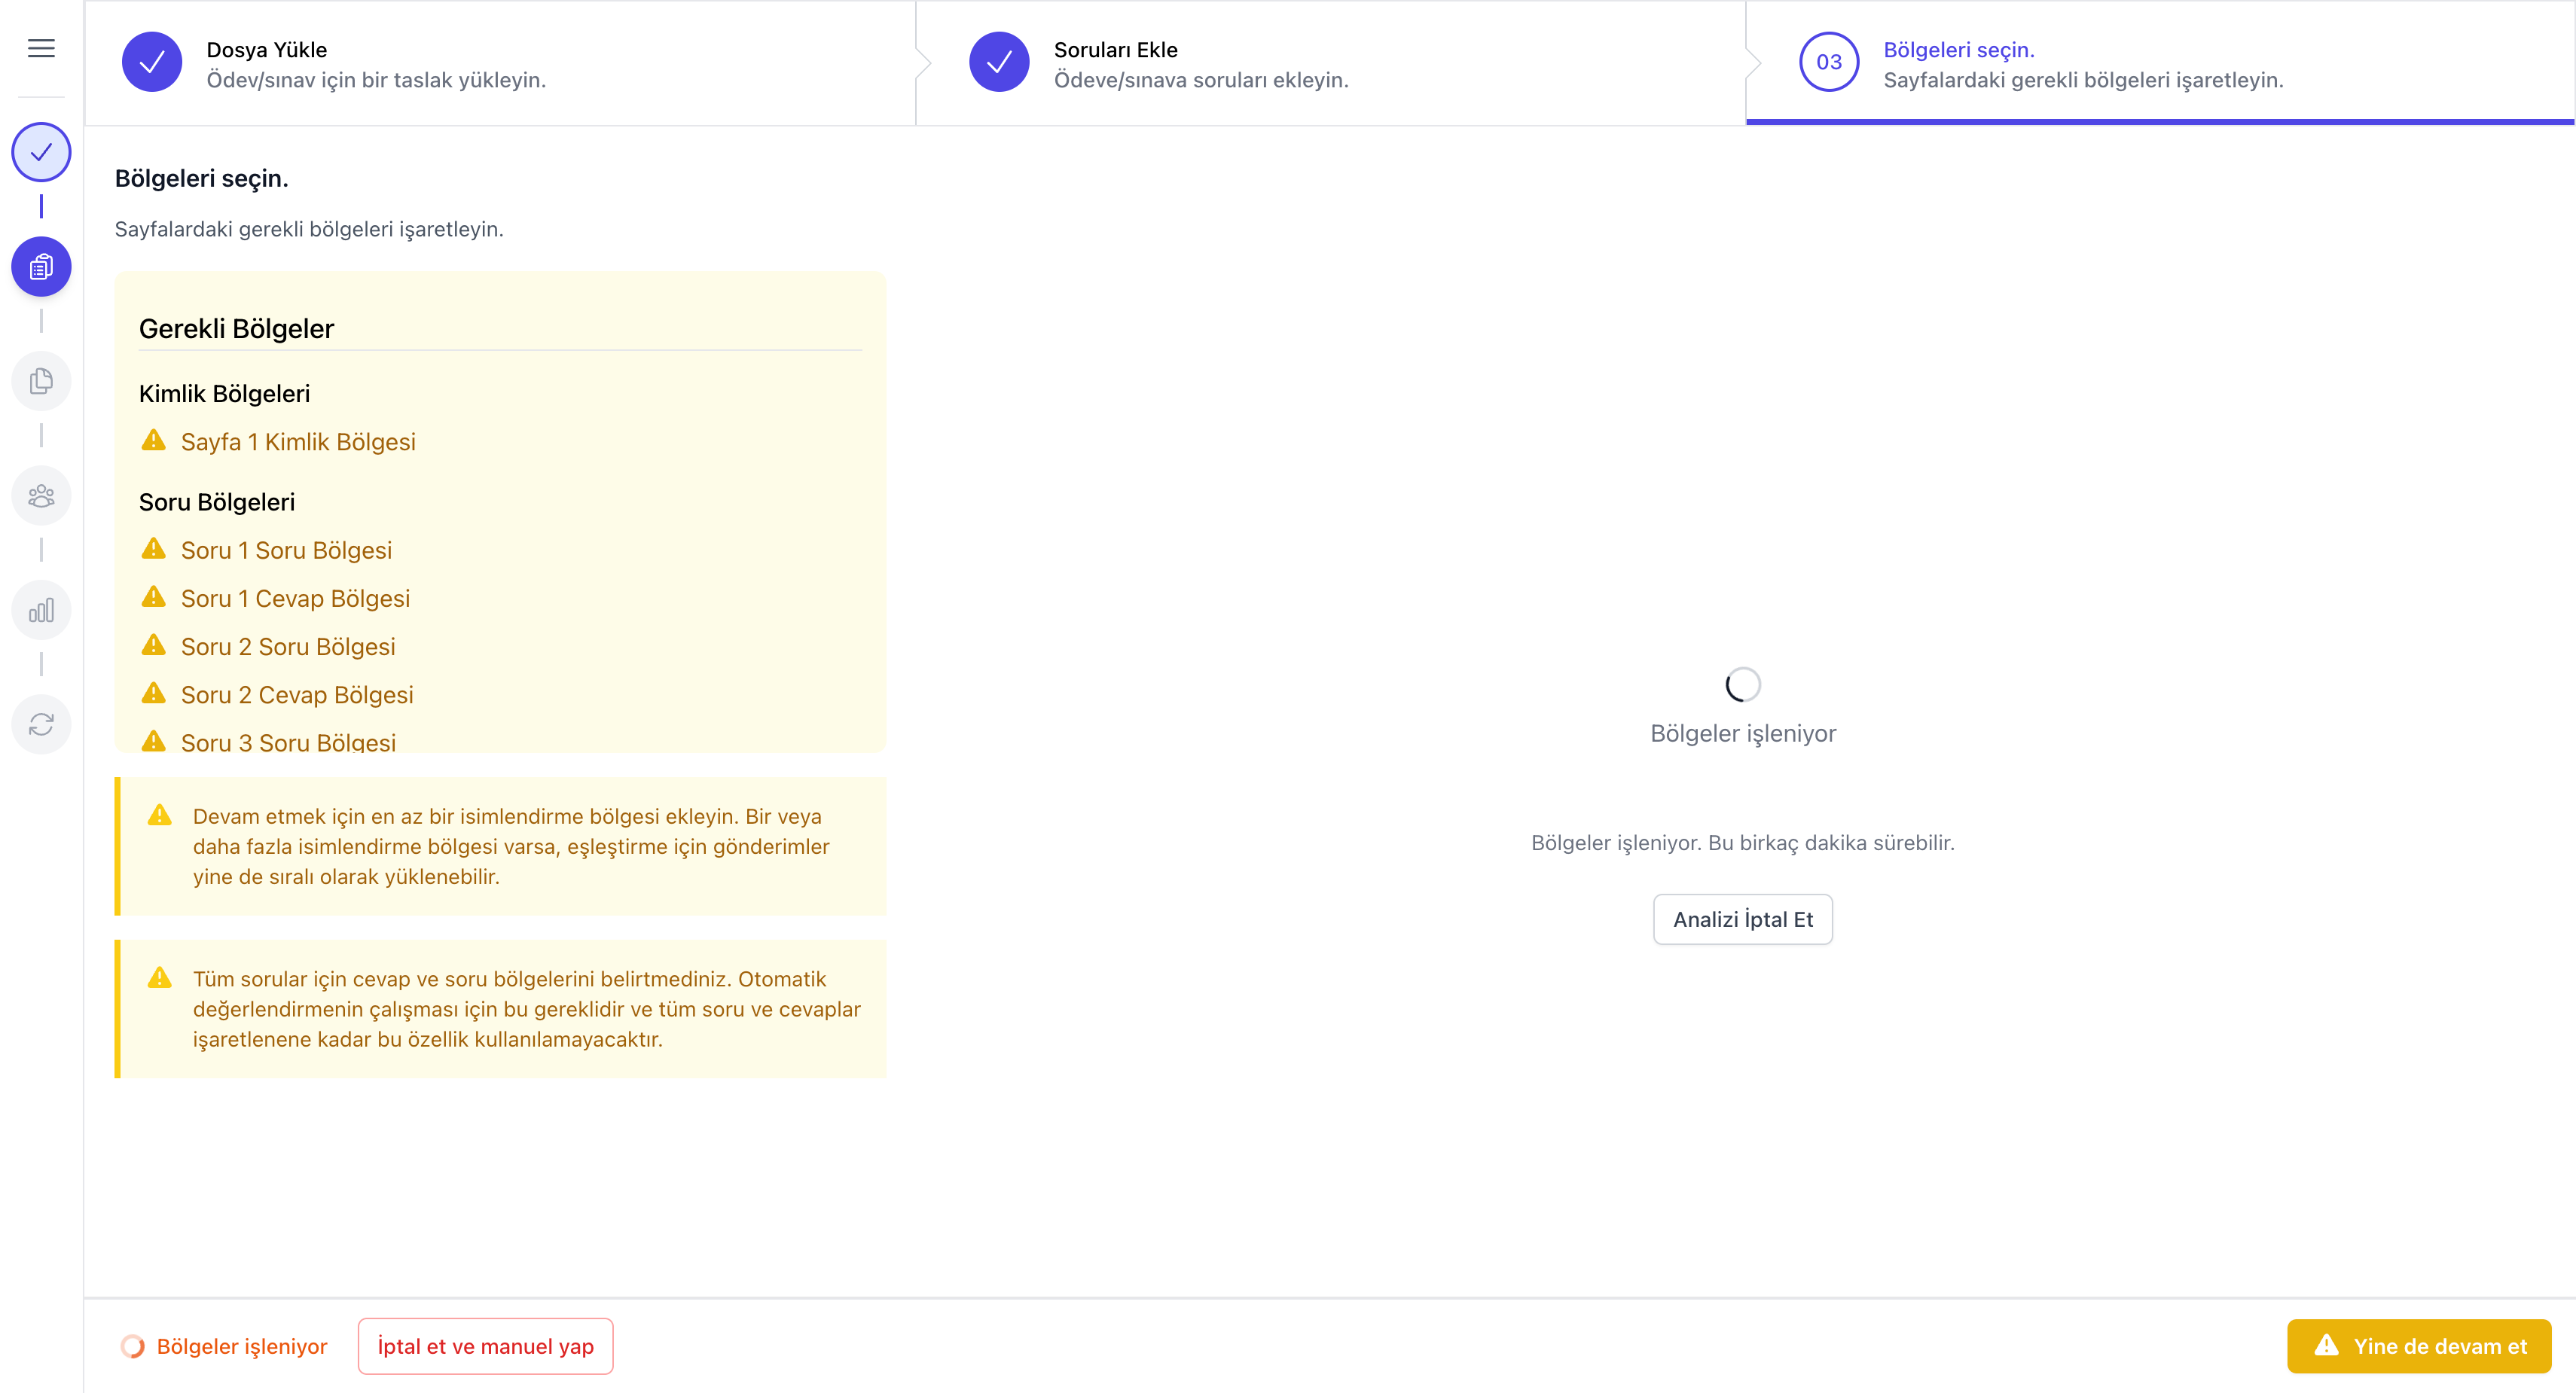
- Sol kısımdaki Gerekli Bölgeler listesi, sistemin beklediği tüm bölgelerin durumunu gösterir. Turuncu üçgen henüz oluşturulmadığı, yeşil onay ise hazır olduğu anlamına gelir.
- Analizi İptal Et bağlantısı, beklemek istemiyorsanız tüm bölgeleri elle çizmenize olanak tanır.
- Aşağıdaki ikinci uyarı, otomatik değerlendirmenin çalışabilmesi için tüm soru ve cevap bölgelerinin işaretlenmiş olması gerektiğini hatırlatır.
AI tarafından isimlendirilmiş bölgeler
Analiz tamamlanınca sistem her bölgeyi otomatik olarak Soru/Cevap olarak etiketler. Yeşil renk Cevap Bölgesi (CB), mavi renk Soru Bölgesi (SB) içindir. Henüz Kimlik bölgesi olmadığı için sol panel üst kısmı turuncu uyarı içerir.
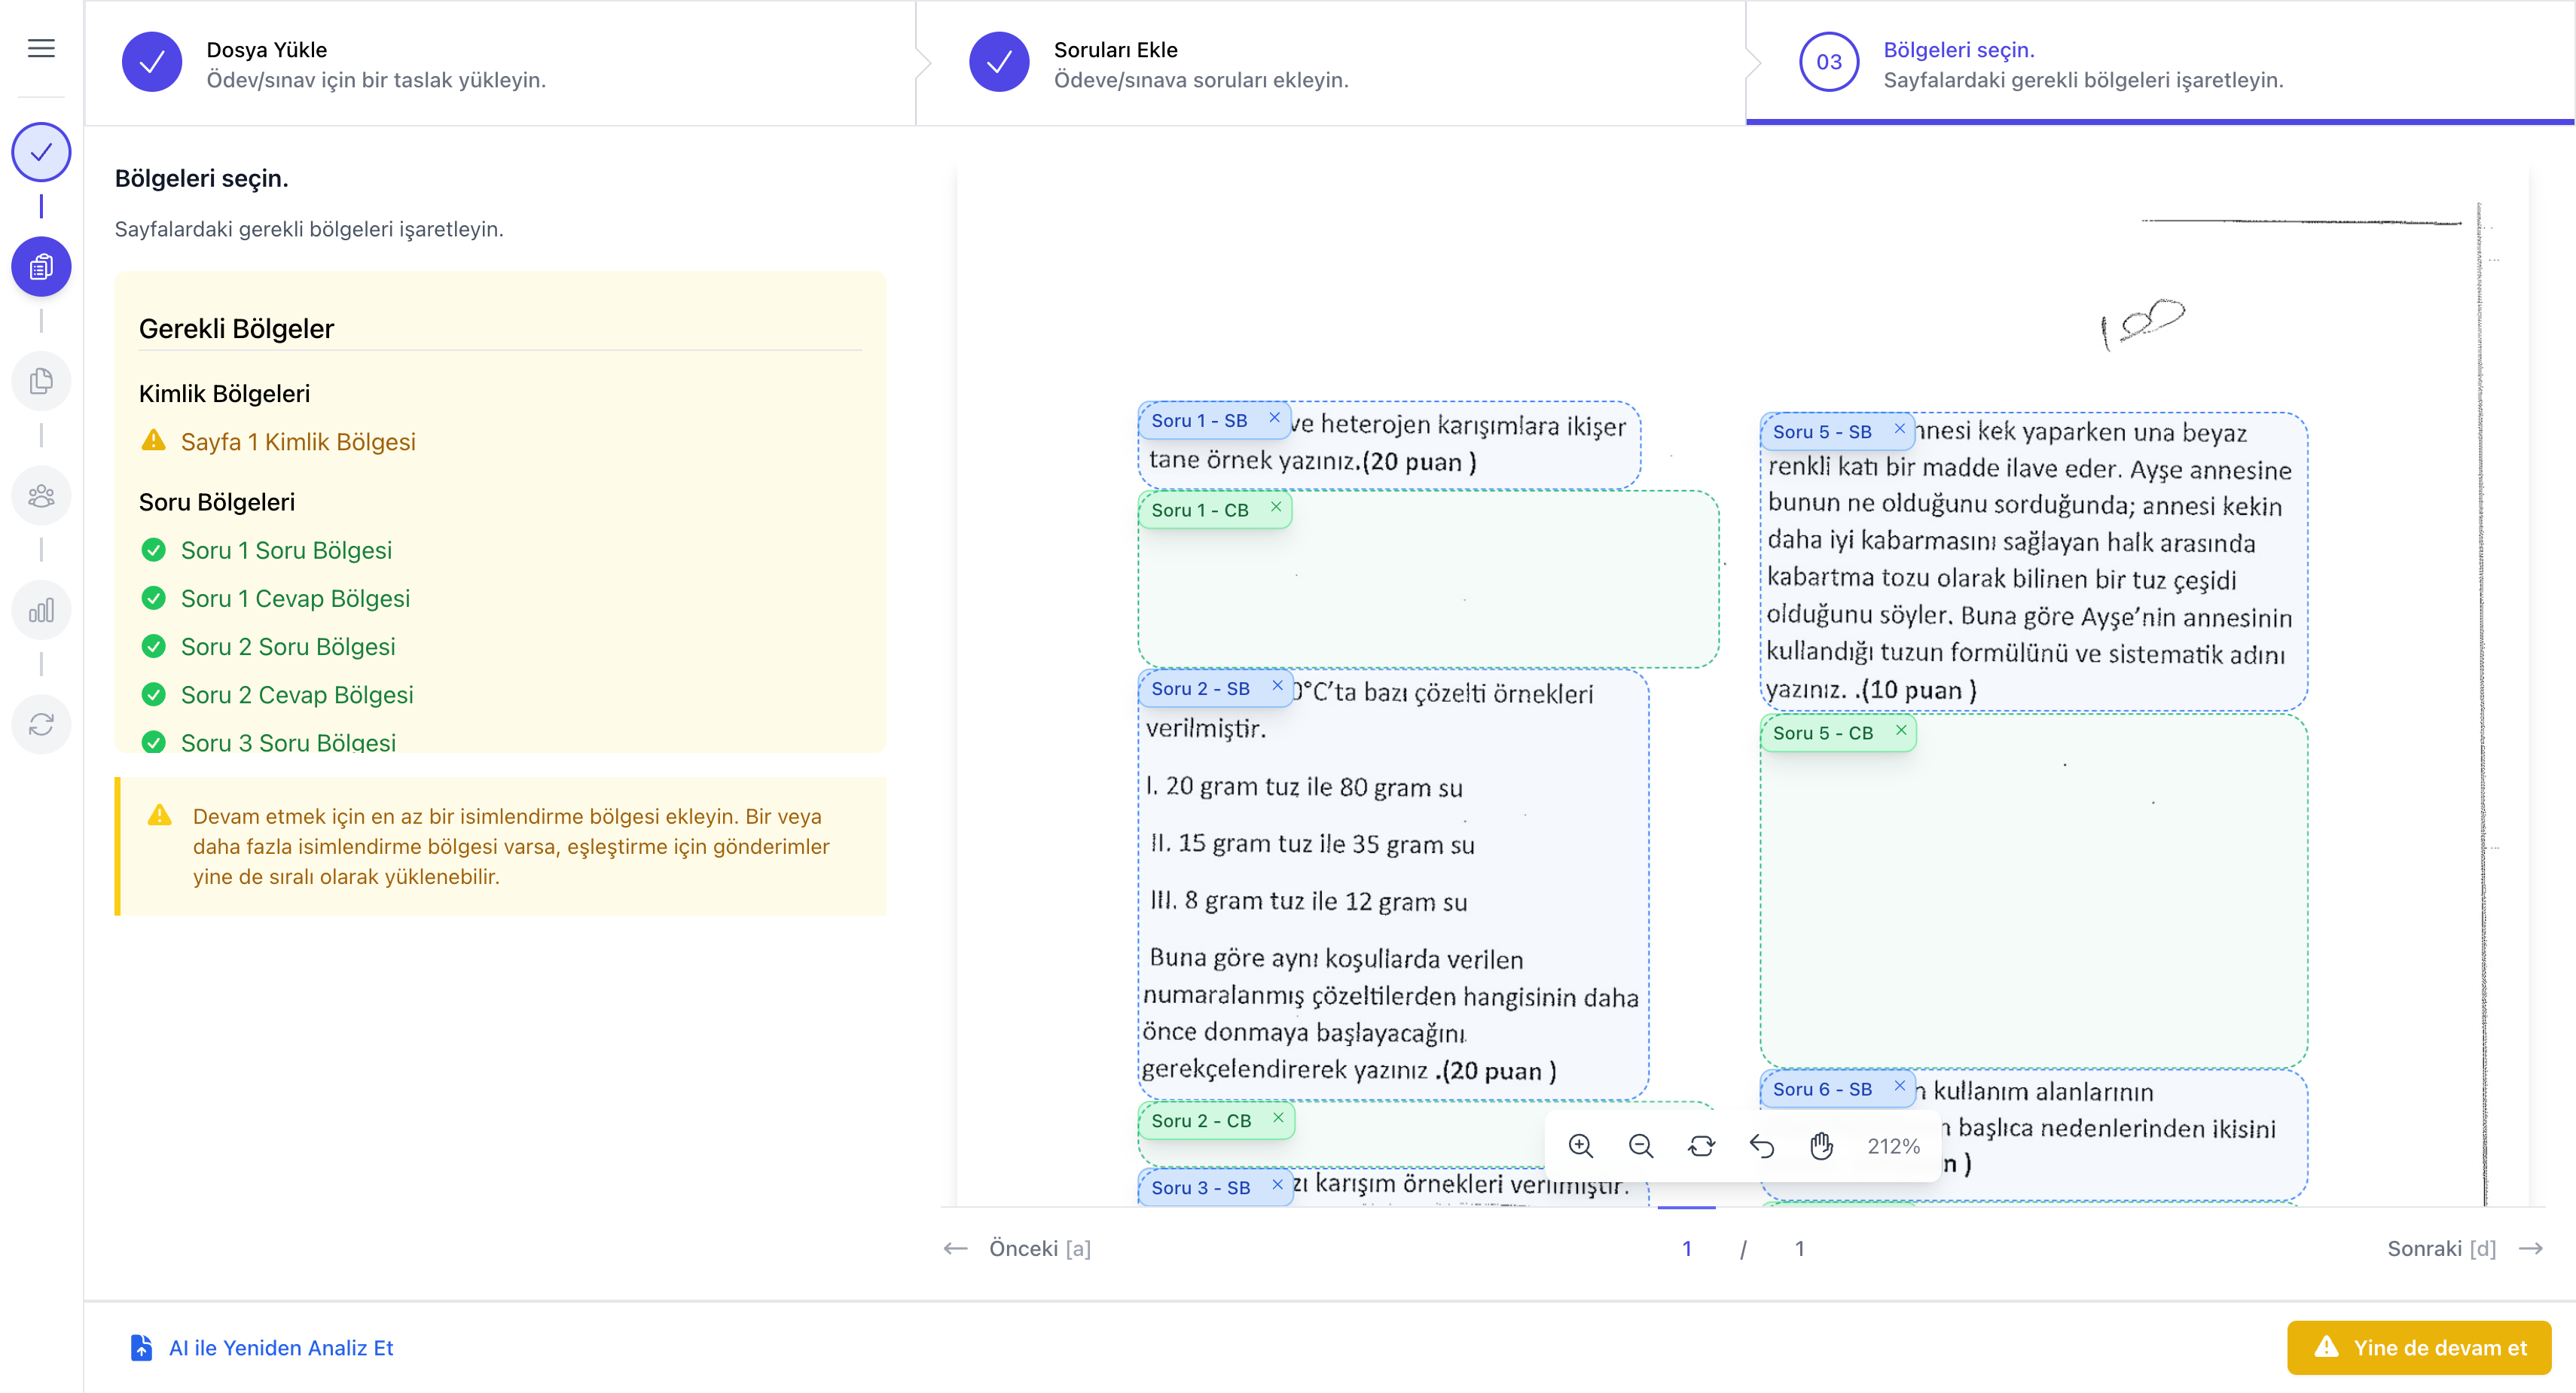
- SB (Soru Bölgesi) mavi çerçeveyle gösterilir; sorunun metnini içerir.
- CB (Cevap Bölgesi) yeşil çerçeveyle gösterilir; öğrencinin yazacağı boşluğu kapsar.
- Bölge çerçevelerinin kenarlarından sürükleyerek boyutlandırma yapabilir, ortasından tutarak yer değiştirebilirsiniz.
- Bir bölgeyi silmek için sağ üstteki
×simgesini kullanın; yanlış bölge oluştuysa silip yeniden çizmek mümkündür.
Bölgeleri sorulara eşleme
Bir bölgeyi tıkladığınızda 'Bölge Seç' küçük dialogu açılır. Bu dialogdan bölgenin hangi soruya/kimliğe ait olduğunu seçebilirsiniz. AI bunu çoğunlukla doğru tahmin eder; uyumsuzluk varsa elle düzeltebilirsiniz.
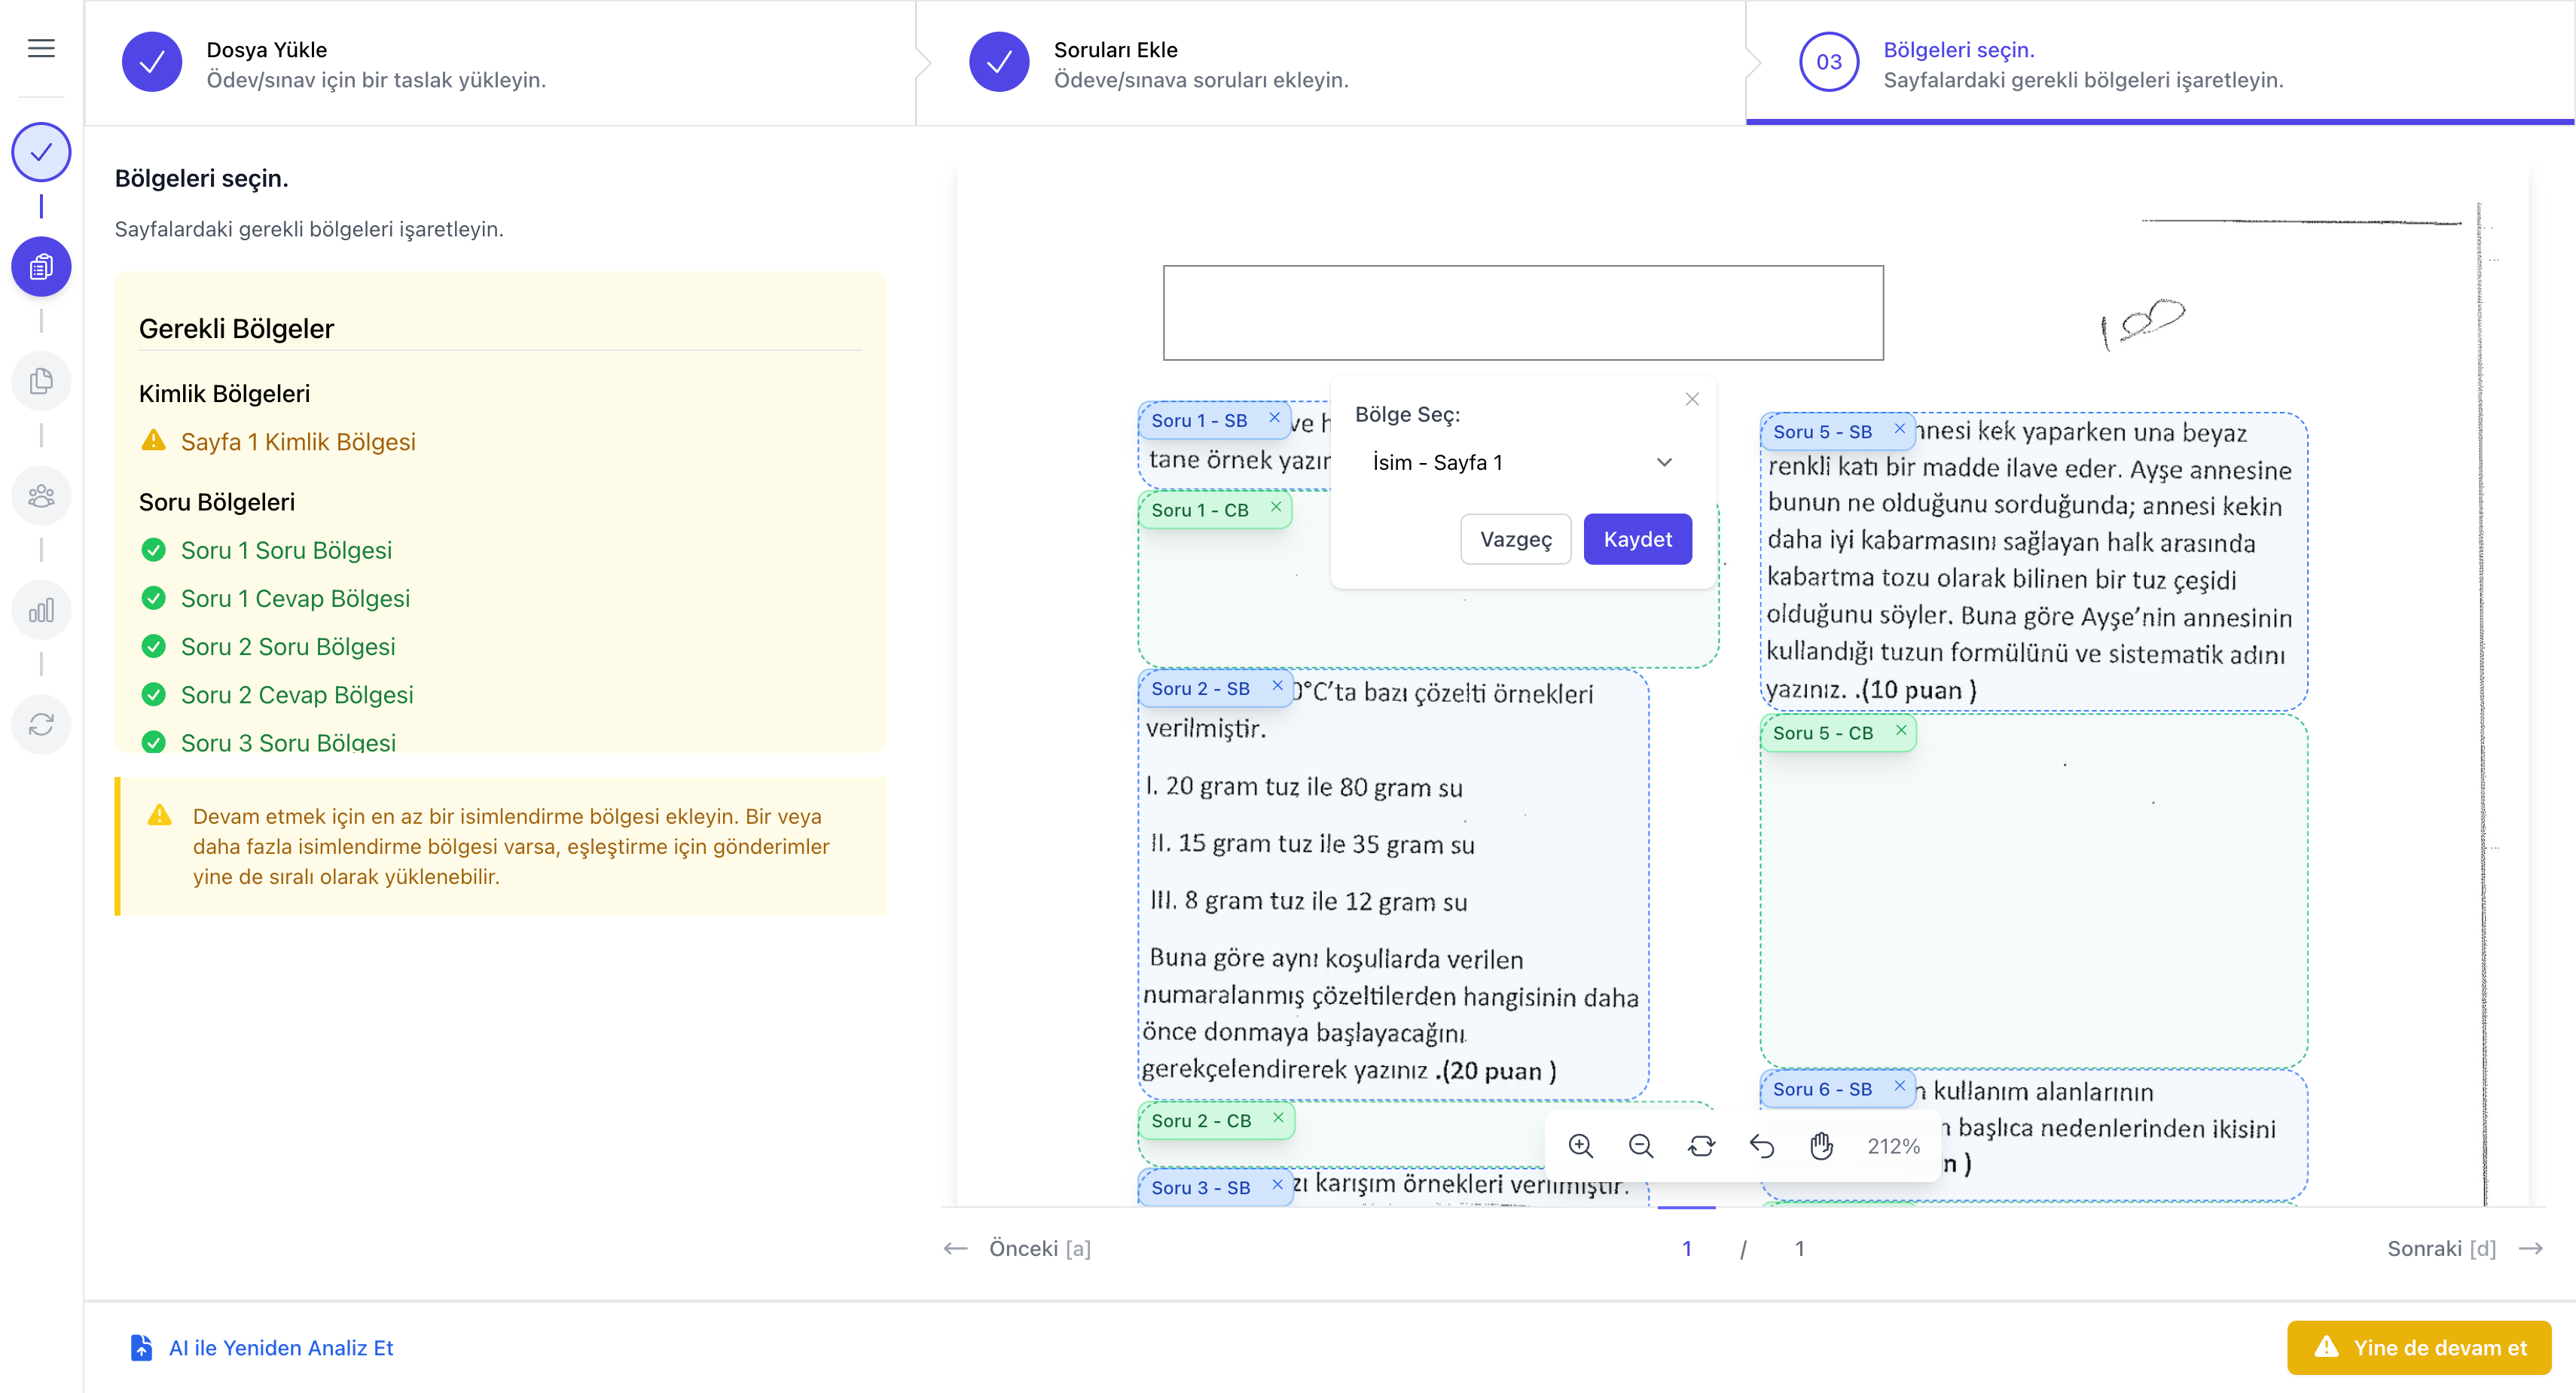
- Bölge Seç açılır menüsünde tüm sorular ve kimlik seçenekleri listelenir; bölgeyi seçtiğiniz adla yeniden etiketler.
- Üstteki boş kutu yeni bir kimlik bölgesi oluşturmak için ipucu olarak görünür; ileride değineceğiz.
- Kaydet bölgenin yeni atamasını uygular; Vazgeç dialogu kapatır ve bölge önceki atanmasıyla kalır.
Eşleme sonrası — gerçek soru adları
Bir bölgeyi belirli bir soruya eşledikten sonra etiketi 'Soru 1 - SB' yerine sorunun gerçek başlığına dönüşür: 'Q1 Homojen ve Heterojen Karışımlar - SB' / 'CB' gibi.
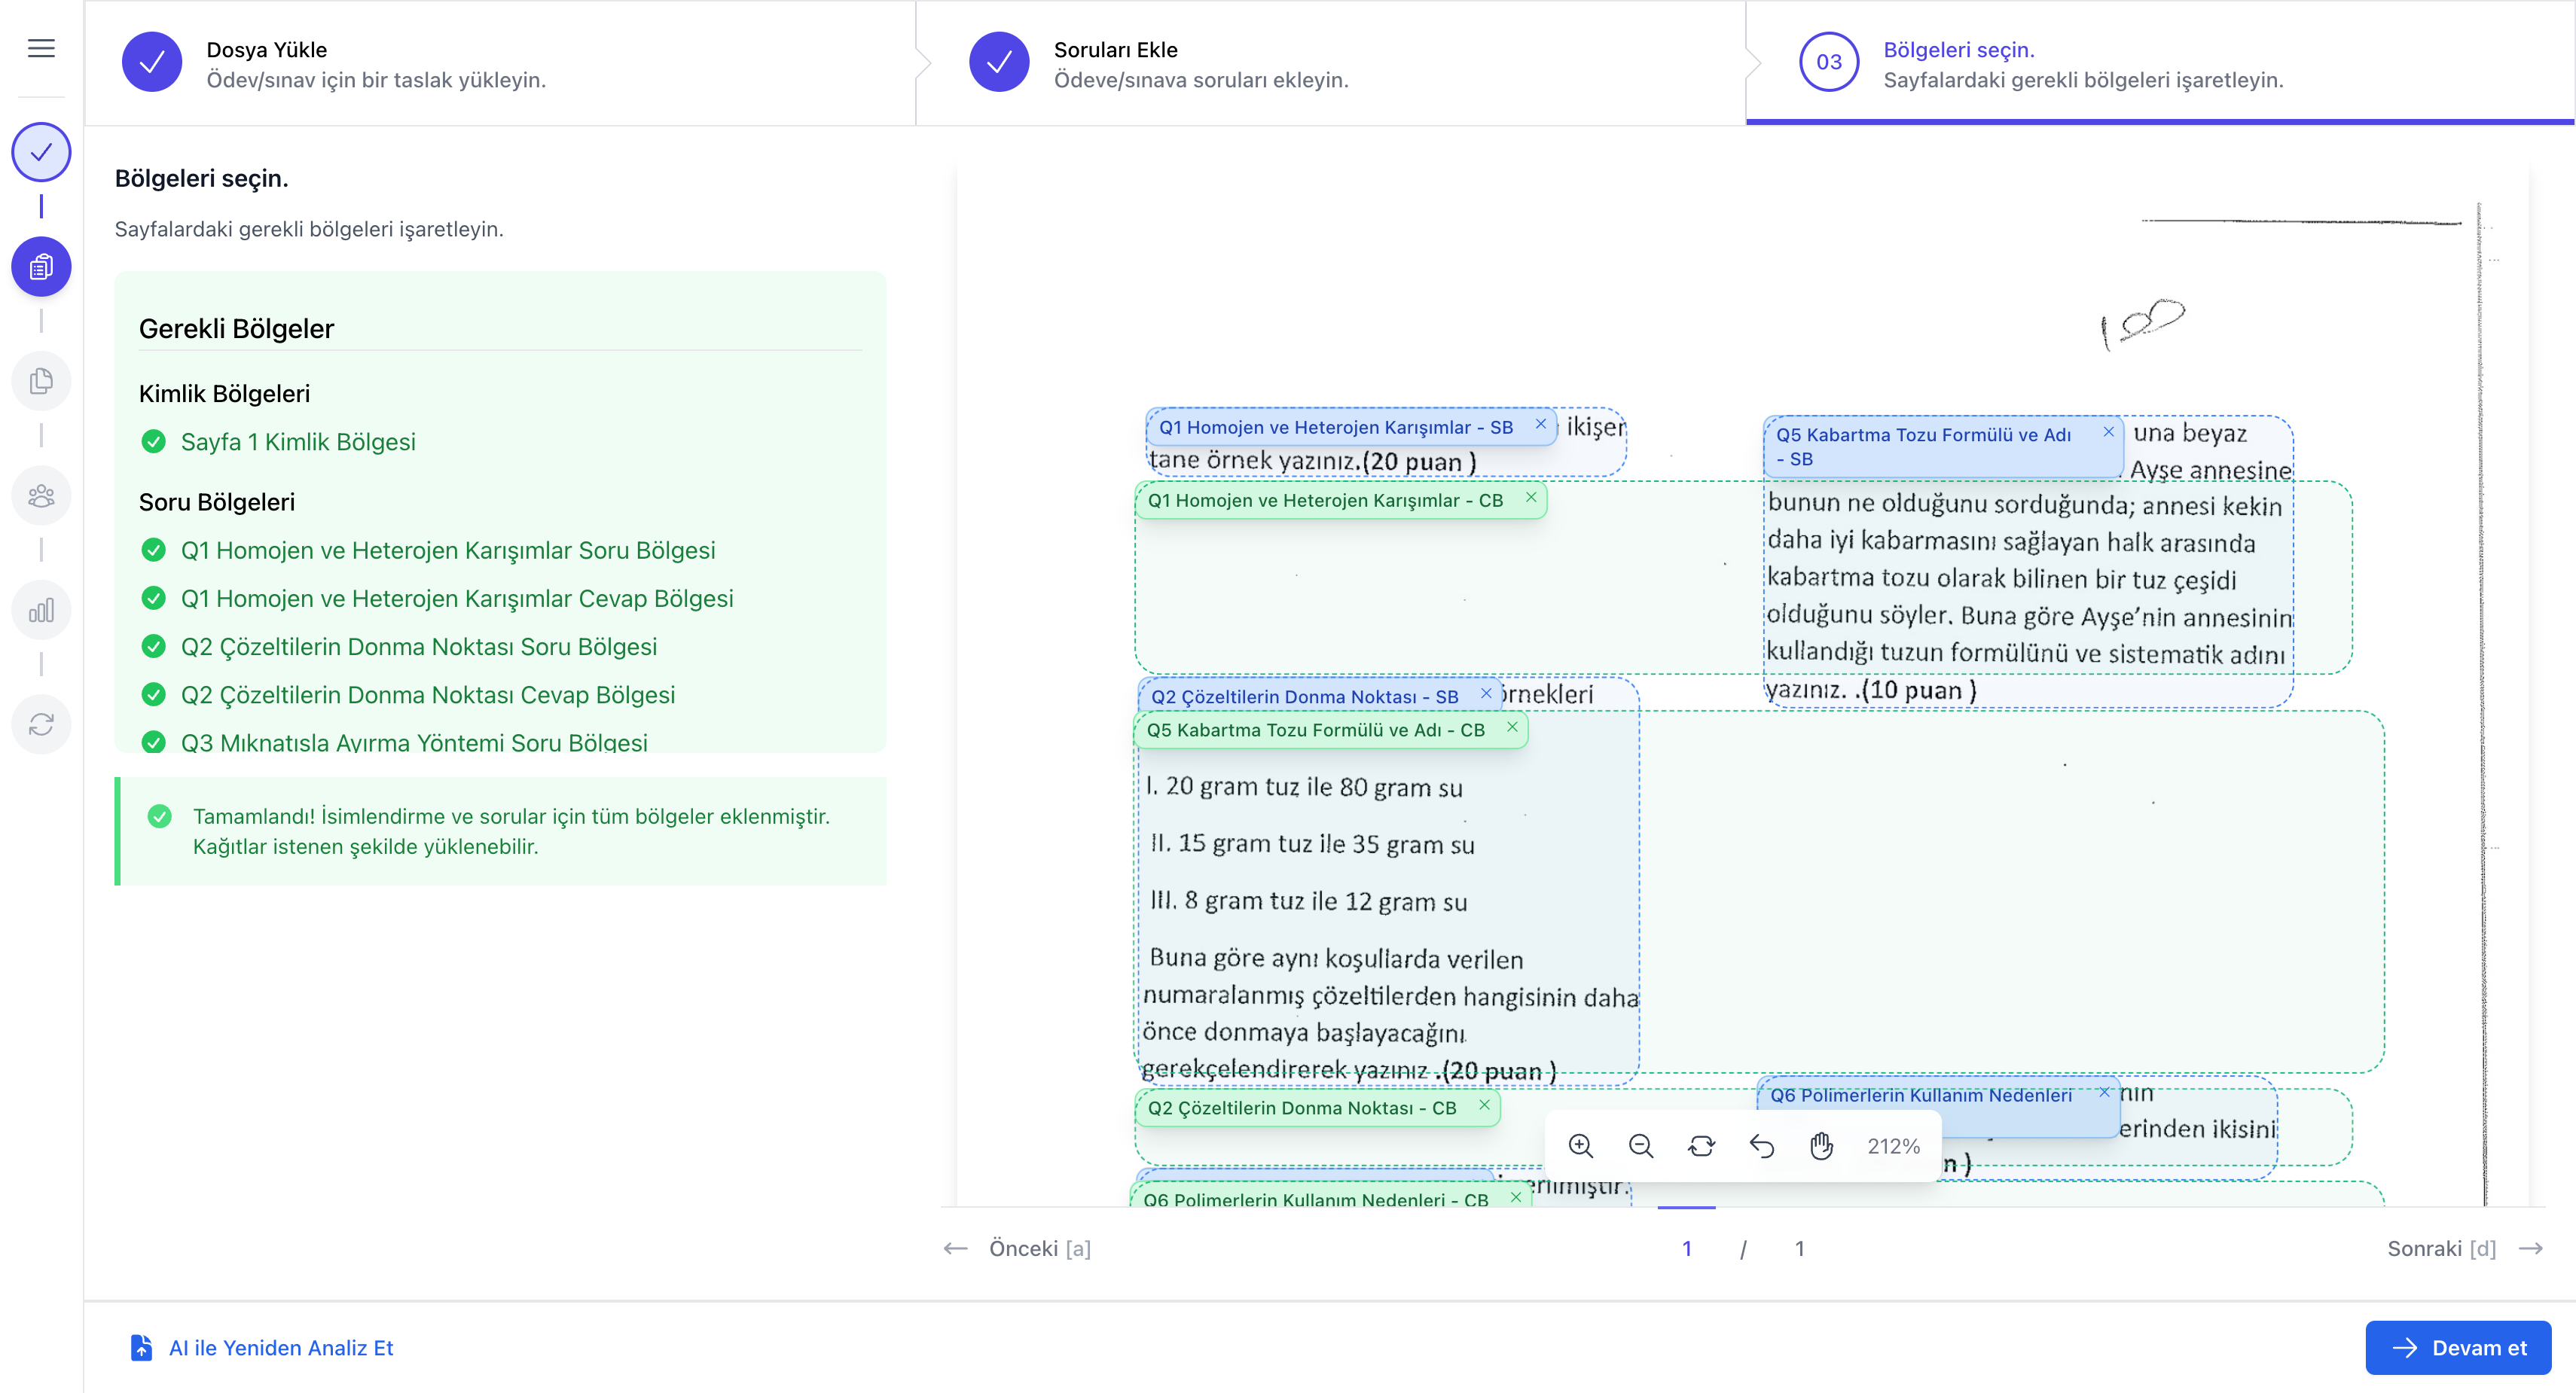
- Bir soru bölgesi (SB) ile cevap bölgesi (CB) çiftinin aynı soruya bağlı olması gerekir. Sistem aksi durumda hata vermez ama notlandırma sırasında kafa karıştırıcı sonuçlar doğabilir.
- Birden fazla bölgenin aynı soruya bağlanması mümkündür; örneğin uzun bir cevap alanı iki ayrı CB olarak tanımlanabilir.
- Sol paneldeki yeşil tikler eşlemenin başarıyla kaydedildiğini doğrular.
Kimlik bölgesi ekleme
Sayfa üzerinde boş bir alanı sürükleyerek yeni bir bölge çizip 'İsim - Sayfa 1' olarak işaretleyin. Bu bölge öğrencinin adını yazacağı yerdir ve sistem yüklenen kağıtları otomatik olarak doğru öğrenciye eşleyebilmek için bunu kullanır.
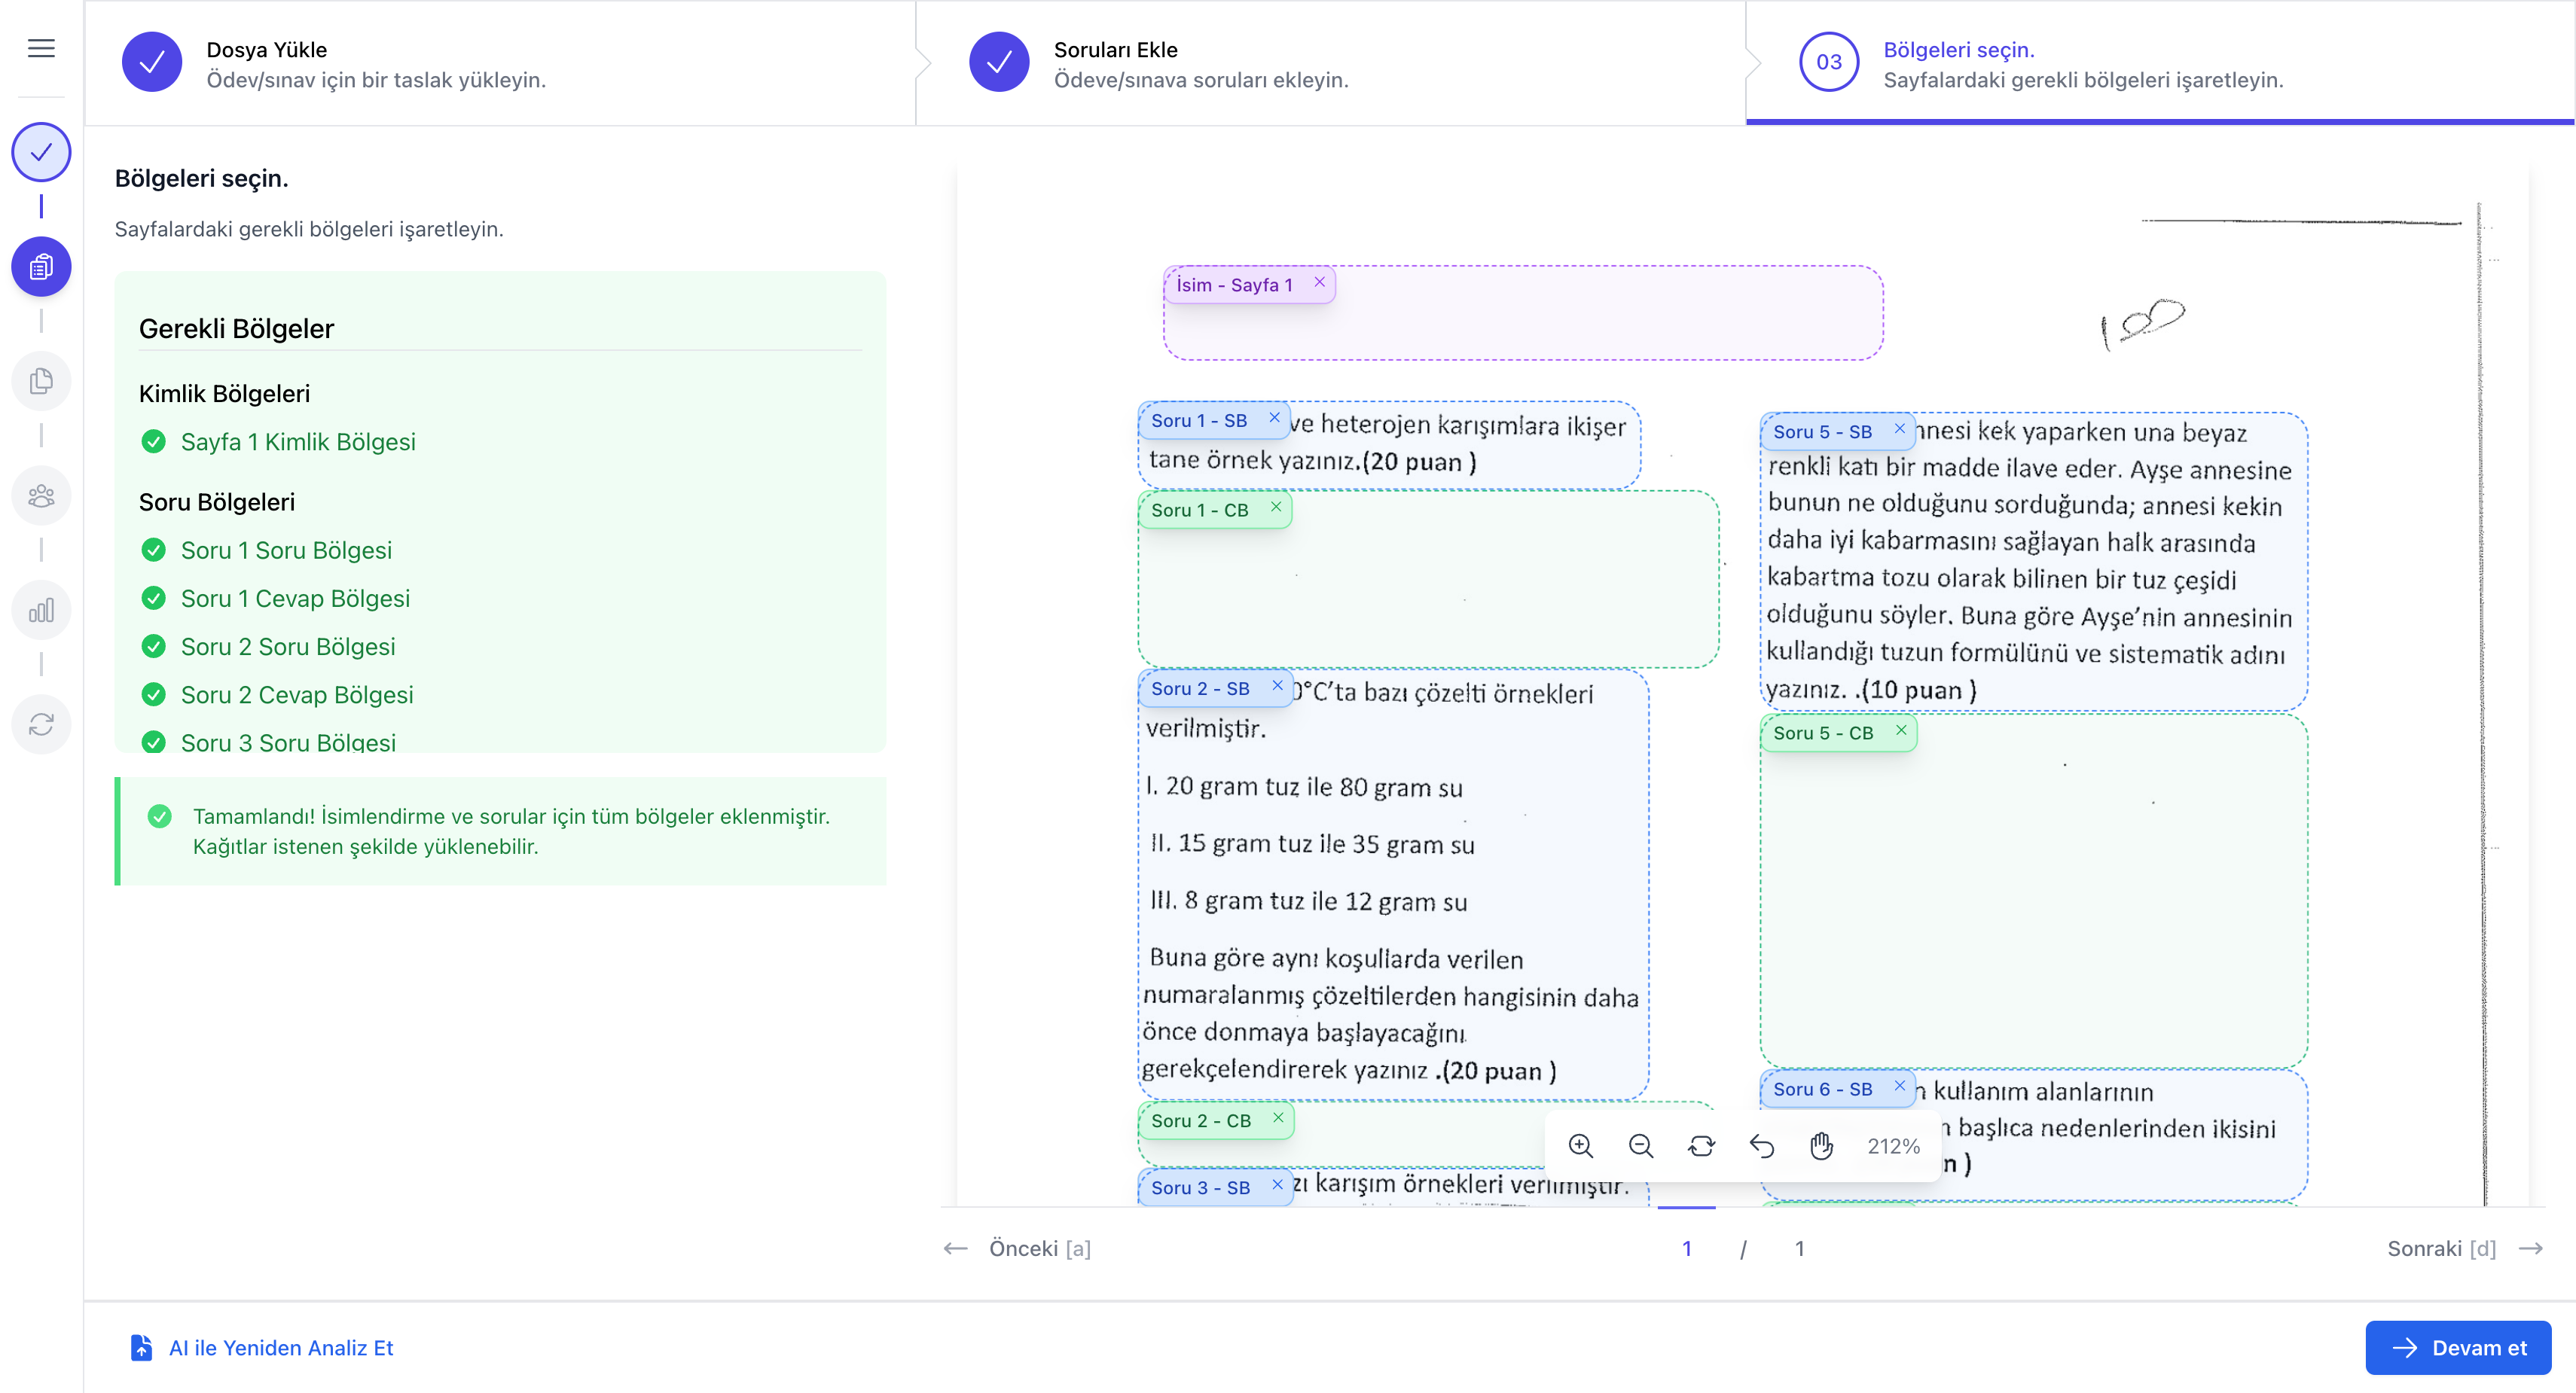
- İsim bölgesi kağıdın üst kısmında, öğrencinin adını yazdığı yere konumlandırılmalıdır. Çok büyük tutmak okumayı zorlaştırabilir; çok küçük tutmak ise eşlemeyi başarısız kılabilir.
- Birden fazla sayfanız varsa her sayfa için ayrı bir isim bölgesi tanımlamanız gerekir. Sayfaların sırasını yine de takip edebilirsiniz, ancak isim bölgeleri karışmaması için ayrıdır.
- Sol paneldeki Tamamlandı! mesajı, devam etmek için tüm gerekli bölgelerin hazır olduğunu doğrular.
Tüm bölgeler tamam — başka türlü düzenleme
Bölge düzenini istediğinizde değiştirebilirsiniz; AI tarafından bulunan bölgeleri silmek, taşımak veya yeniden adlandırmak istediğiniz zaman mümkündür.
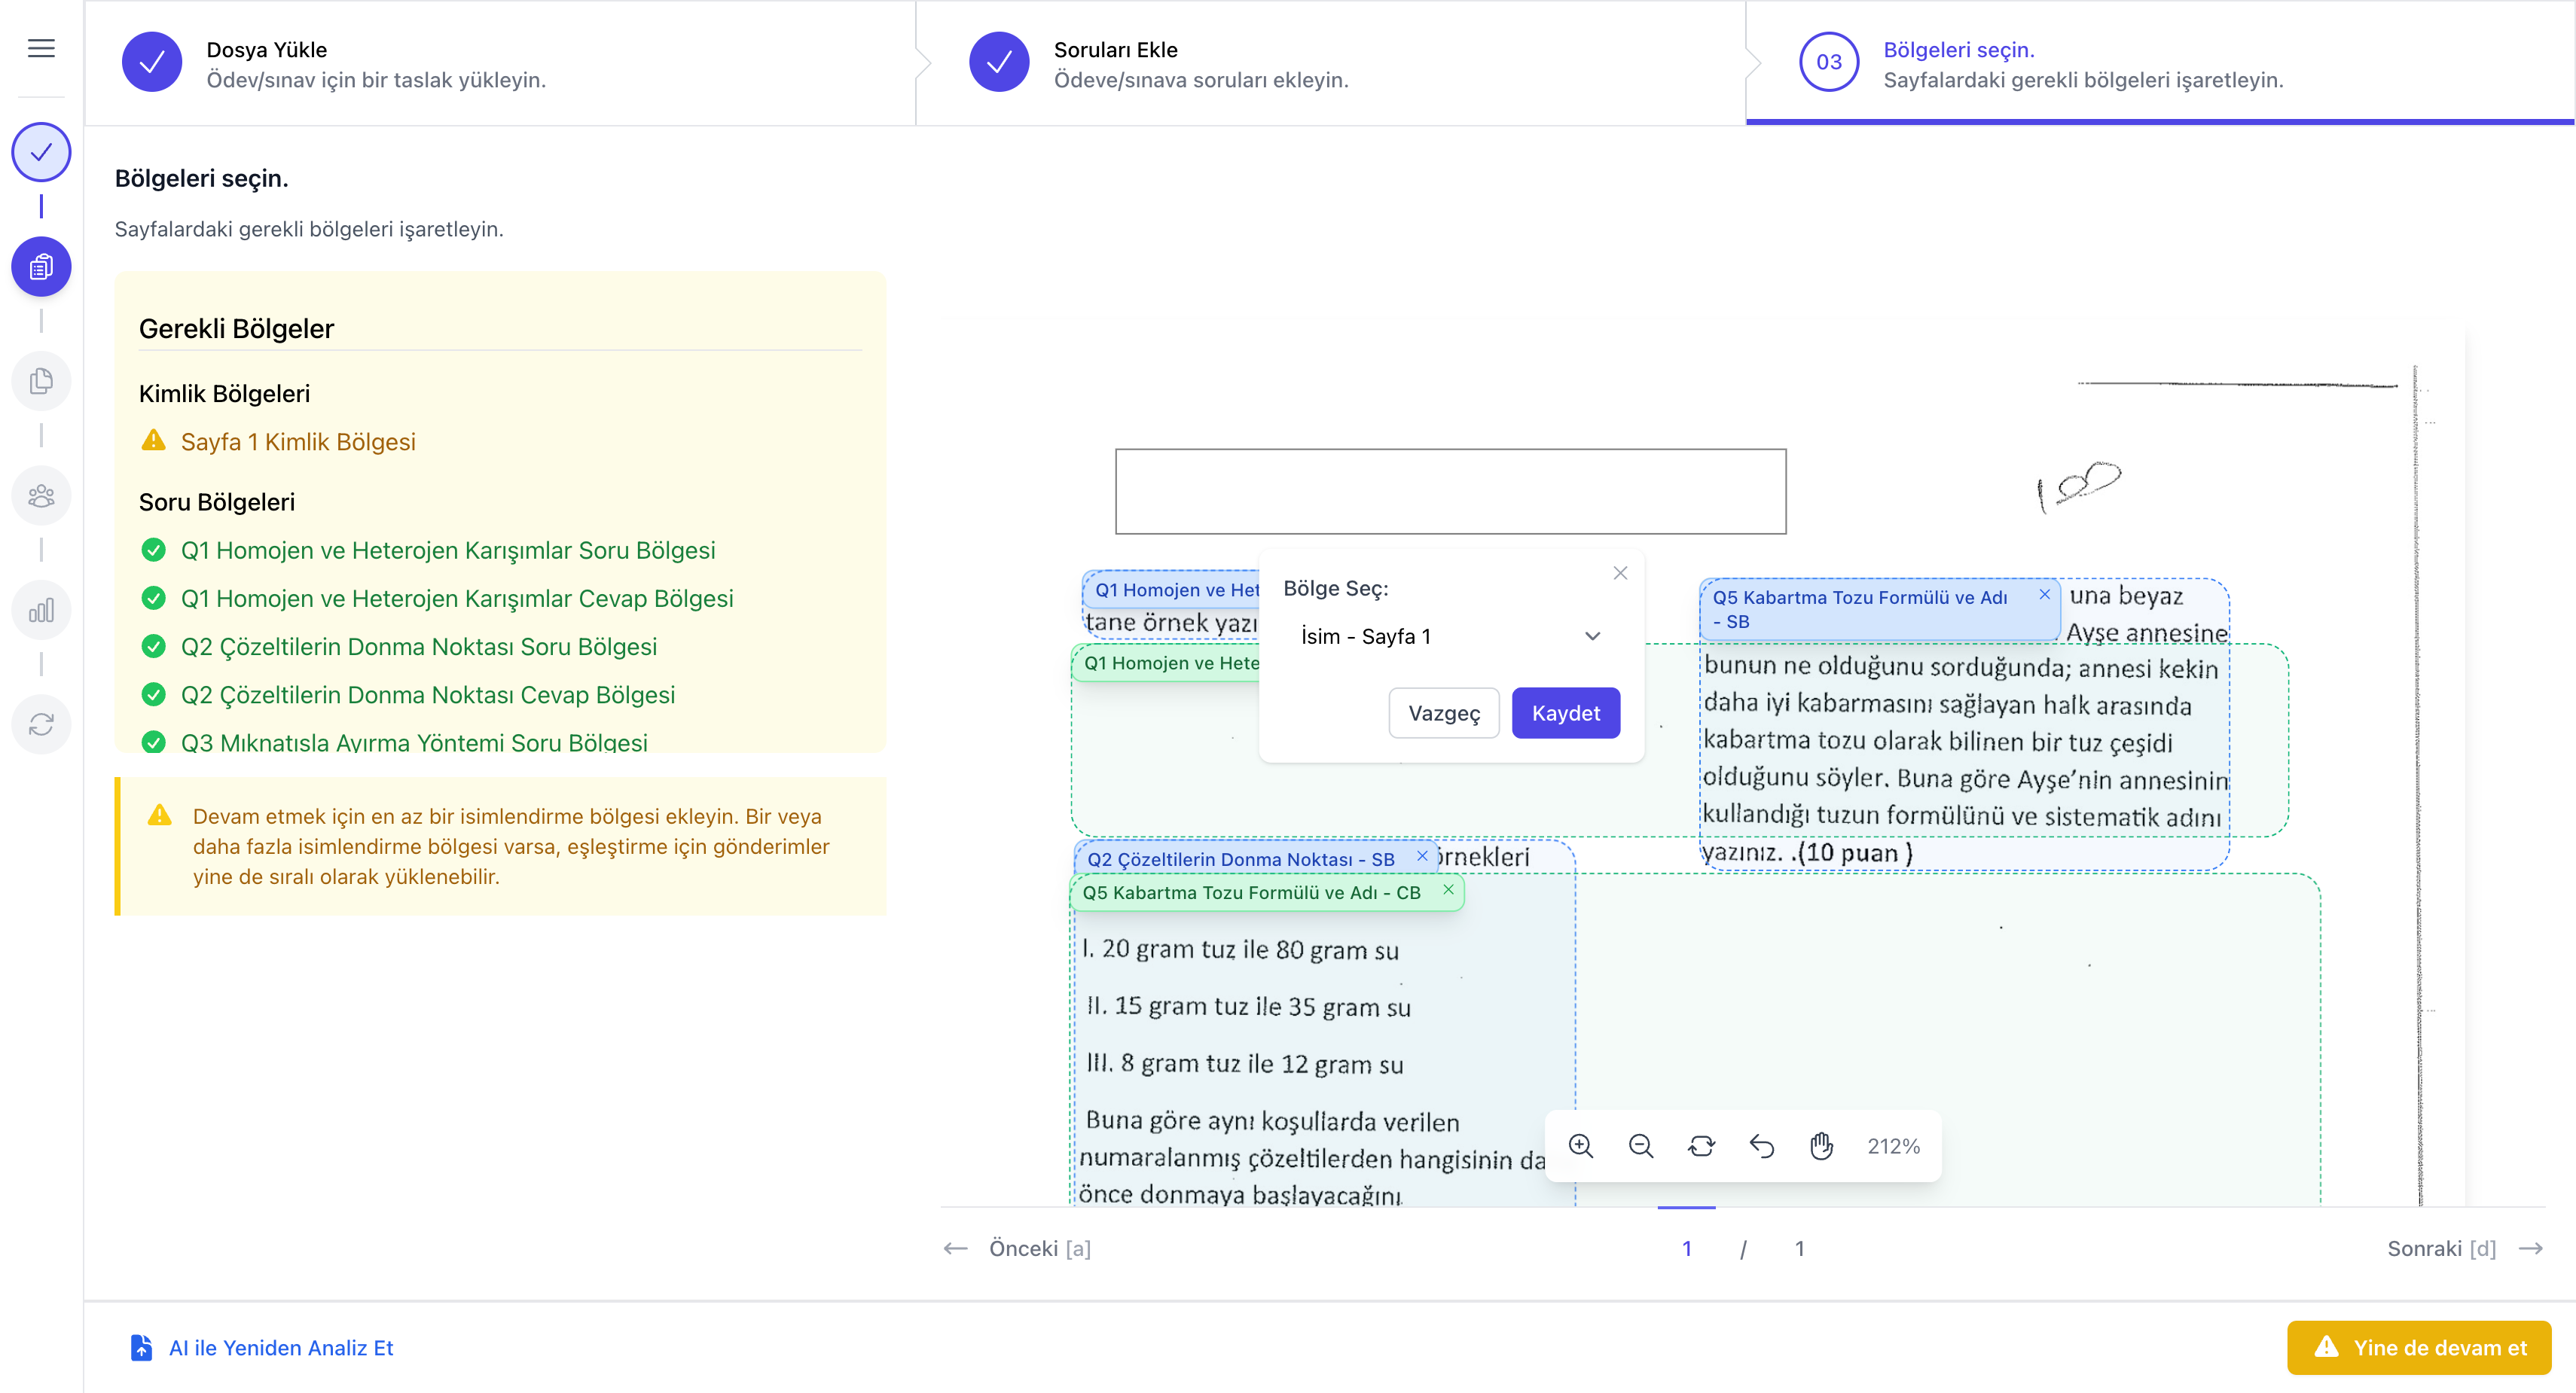
- Bölge etiketinin üzerine tıklayıp Bölge Seç dialogunu yeniden açabilir, başka bir soru/kimlik tanımlayabilirsiniz.
- Yanlış bir bölge oluştursanız bile AI ile Yeniden Analiz Et bağlantısıyla sıfırdan başlayabilirsiniz; bu işlem mevcut bölgeleri silebilir, dikkatli olun.
- Tüm bölgeler tamam olduğunda sağ alttaki Devam et düğmesi yeşile döner ve sizi bir sonraki ana adıma — Öğrenci kağıtlarını yükleme — götürür.