
Mobil
Notla Tarayıcı
Notla Tarayıcı, öğretmenlerin öğrenci kağıtlarını telefonlarıyla tarayıp doğrudan ilgili ödev/sınava göndermesini sağlayan iOS ve Android uygulamasıdır. Kamerayla tarama, sayfa düzeltme ve gönderim eşitleme tek bir akışta yapılır; sonuçlar saniyeler içinde web arayüzündeki Yüklemeleri Yönet sekmesinde görünür.
Notla Tarayıcı nedir?
Tarayıcı uygulaması, web yükleme akışına göre üç ek avantaj sağlar:
- Optimize edilmiş tarama. Kağıt kenarları otomatik algılanır, perspektif düzeltilir ve fiziksel ortamdan gelen kalite kayıpları için ek filtre uygulanır.
- Yığın taramaları. Birden fazla öğrencinin kağıdını tek bir akışta arka arkaya tarayıp tek bir Yükle dokunuşuyla gönderebilirsiniz.
- Eksik öğrencileri kapatma."Eksik" filtresiyle yalnızca henüz gönderim alınmamış öğrencileri görüp her birinin kağıdını ayrı ayrı yükleyebilirsiniz.
Web ile aynı hesap
Giriş ve dersler
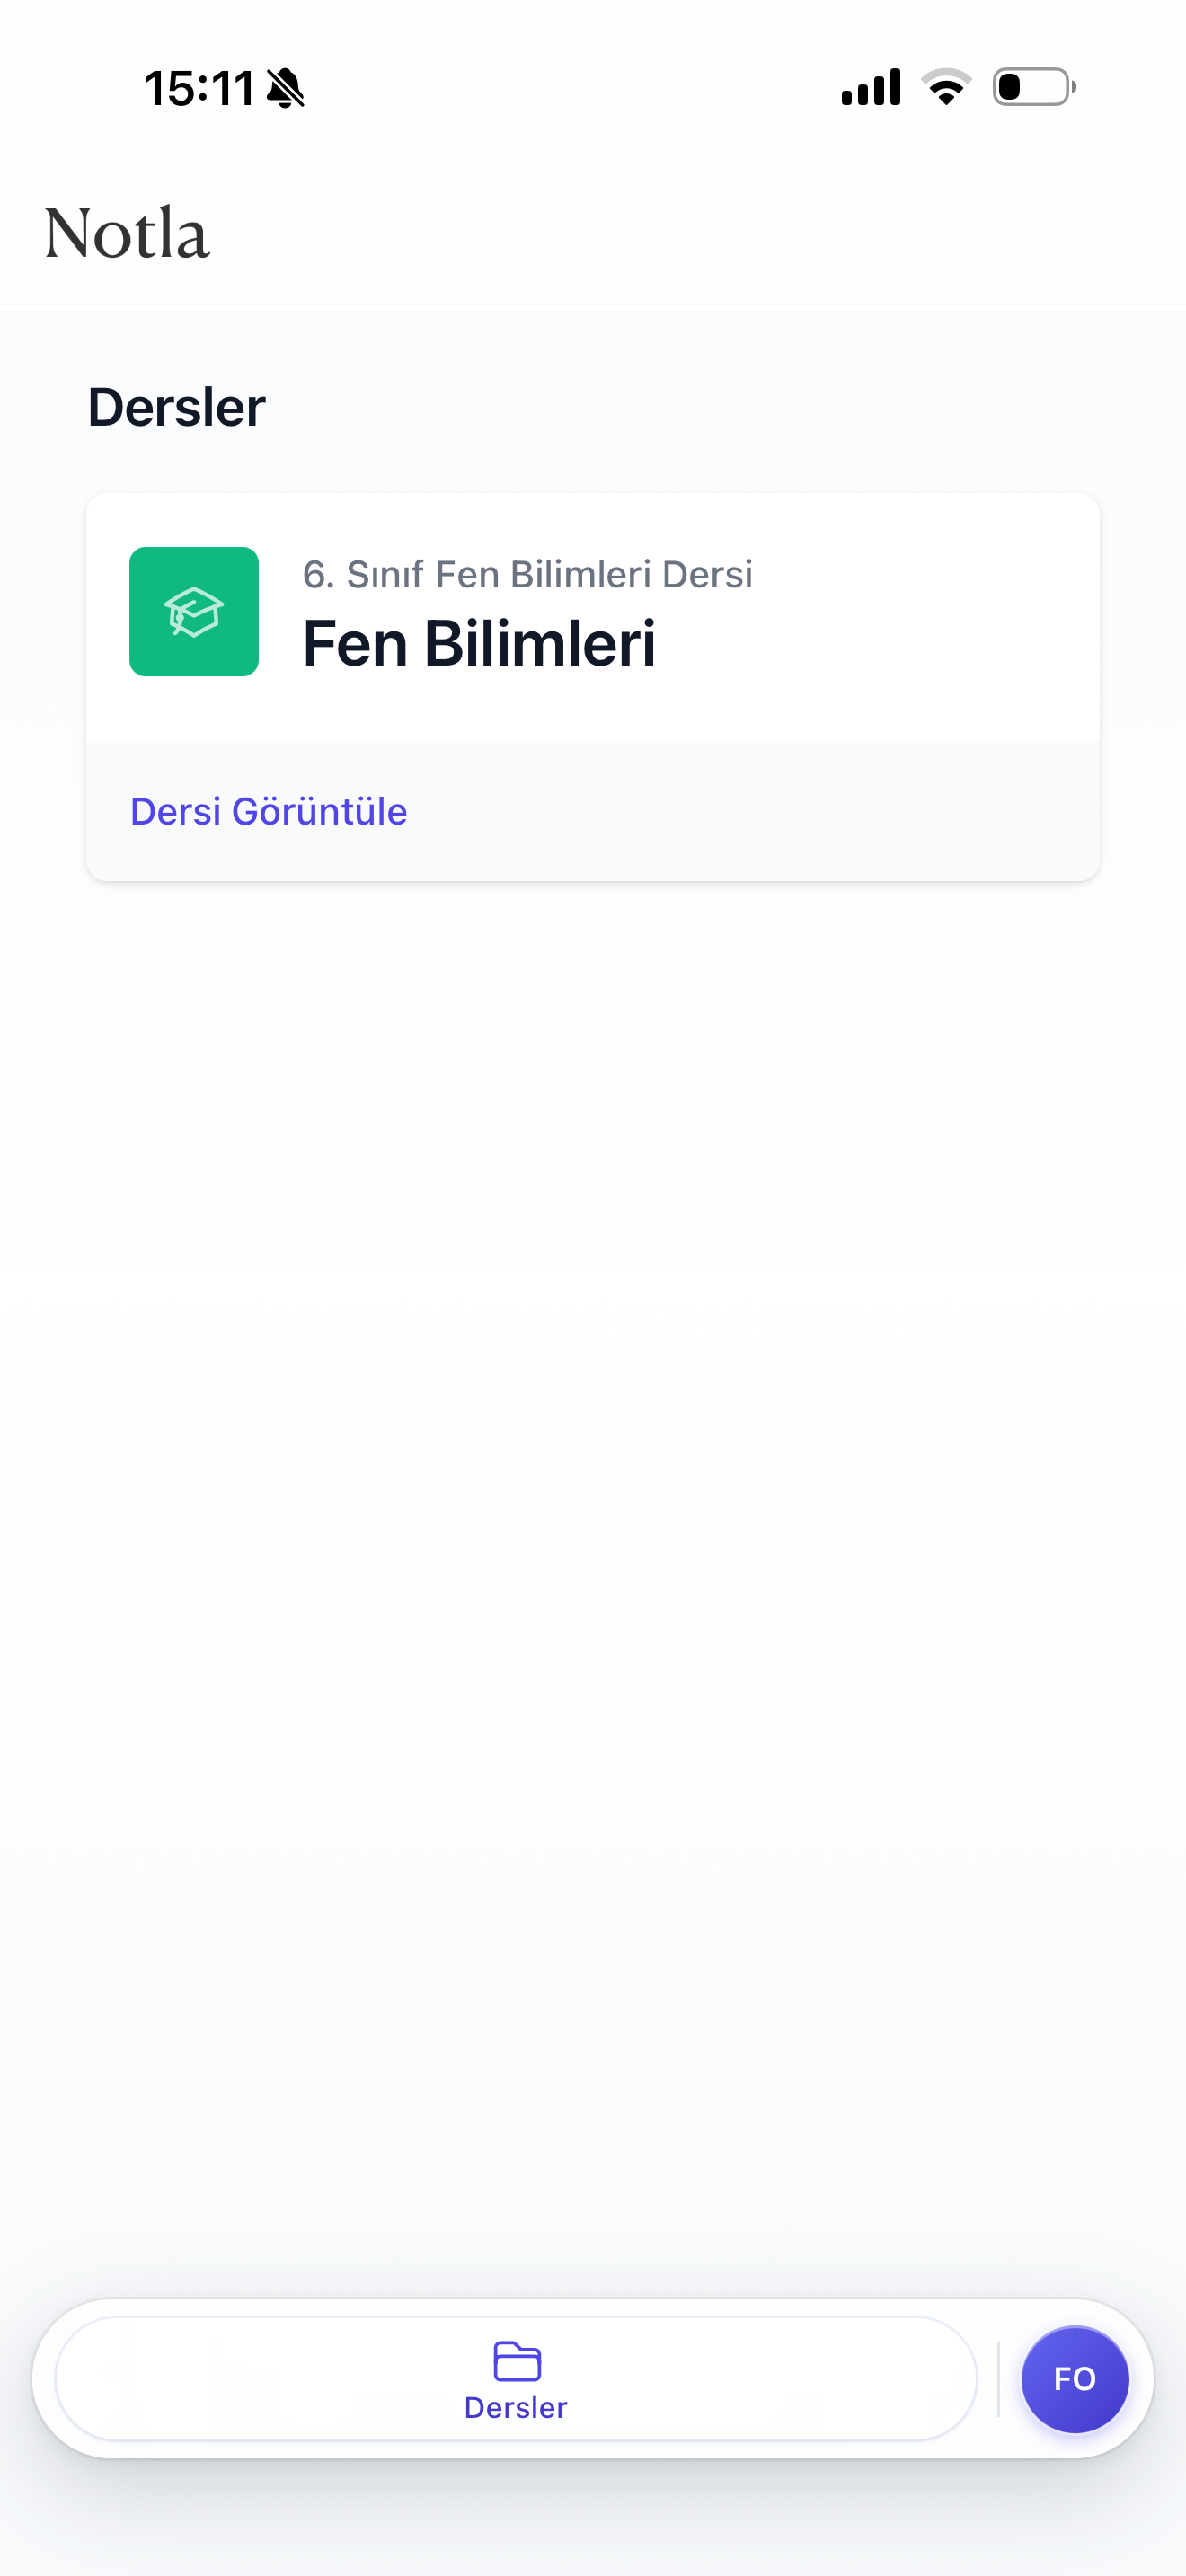
Uygulamayı açıp giriş yaptıktan sonra ana ekranda size atanmış aktif derslerin listesi gelir. Her ders kartı, web arayüzünde olduğu gibi sınıf adı, ders adı ve Dersi Görüntüle bağlantısını içerir. Alt çubuktaki Dersler sekmesi her zaman buraya geri dönmenizi sağlar; sağdaki avatar düğmesi profil ve oturum ayarlarını açar.
Ders detayı
Bir derse dokunduğunuzda, dersin temel istatistikleri (kaç ödev/sınav var, toplam kaç gönderim alındı) ve aktif ödev/sınavların listesi açılır. Her ödev/sınav satırında başlık, açıklama, mevcut yükleme durumu (örnek: Ready to upload) ve gönderim sayısı yer alır. Sağa yaslı ok simgesine dokunarak ödev/sınav detayına geçersiniz.
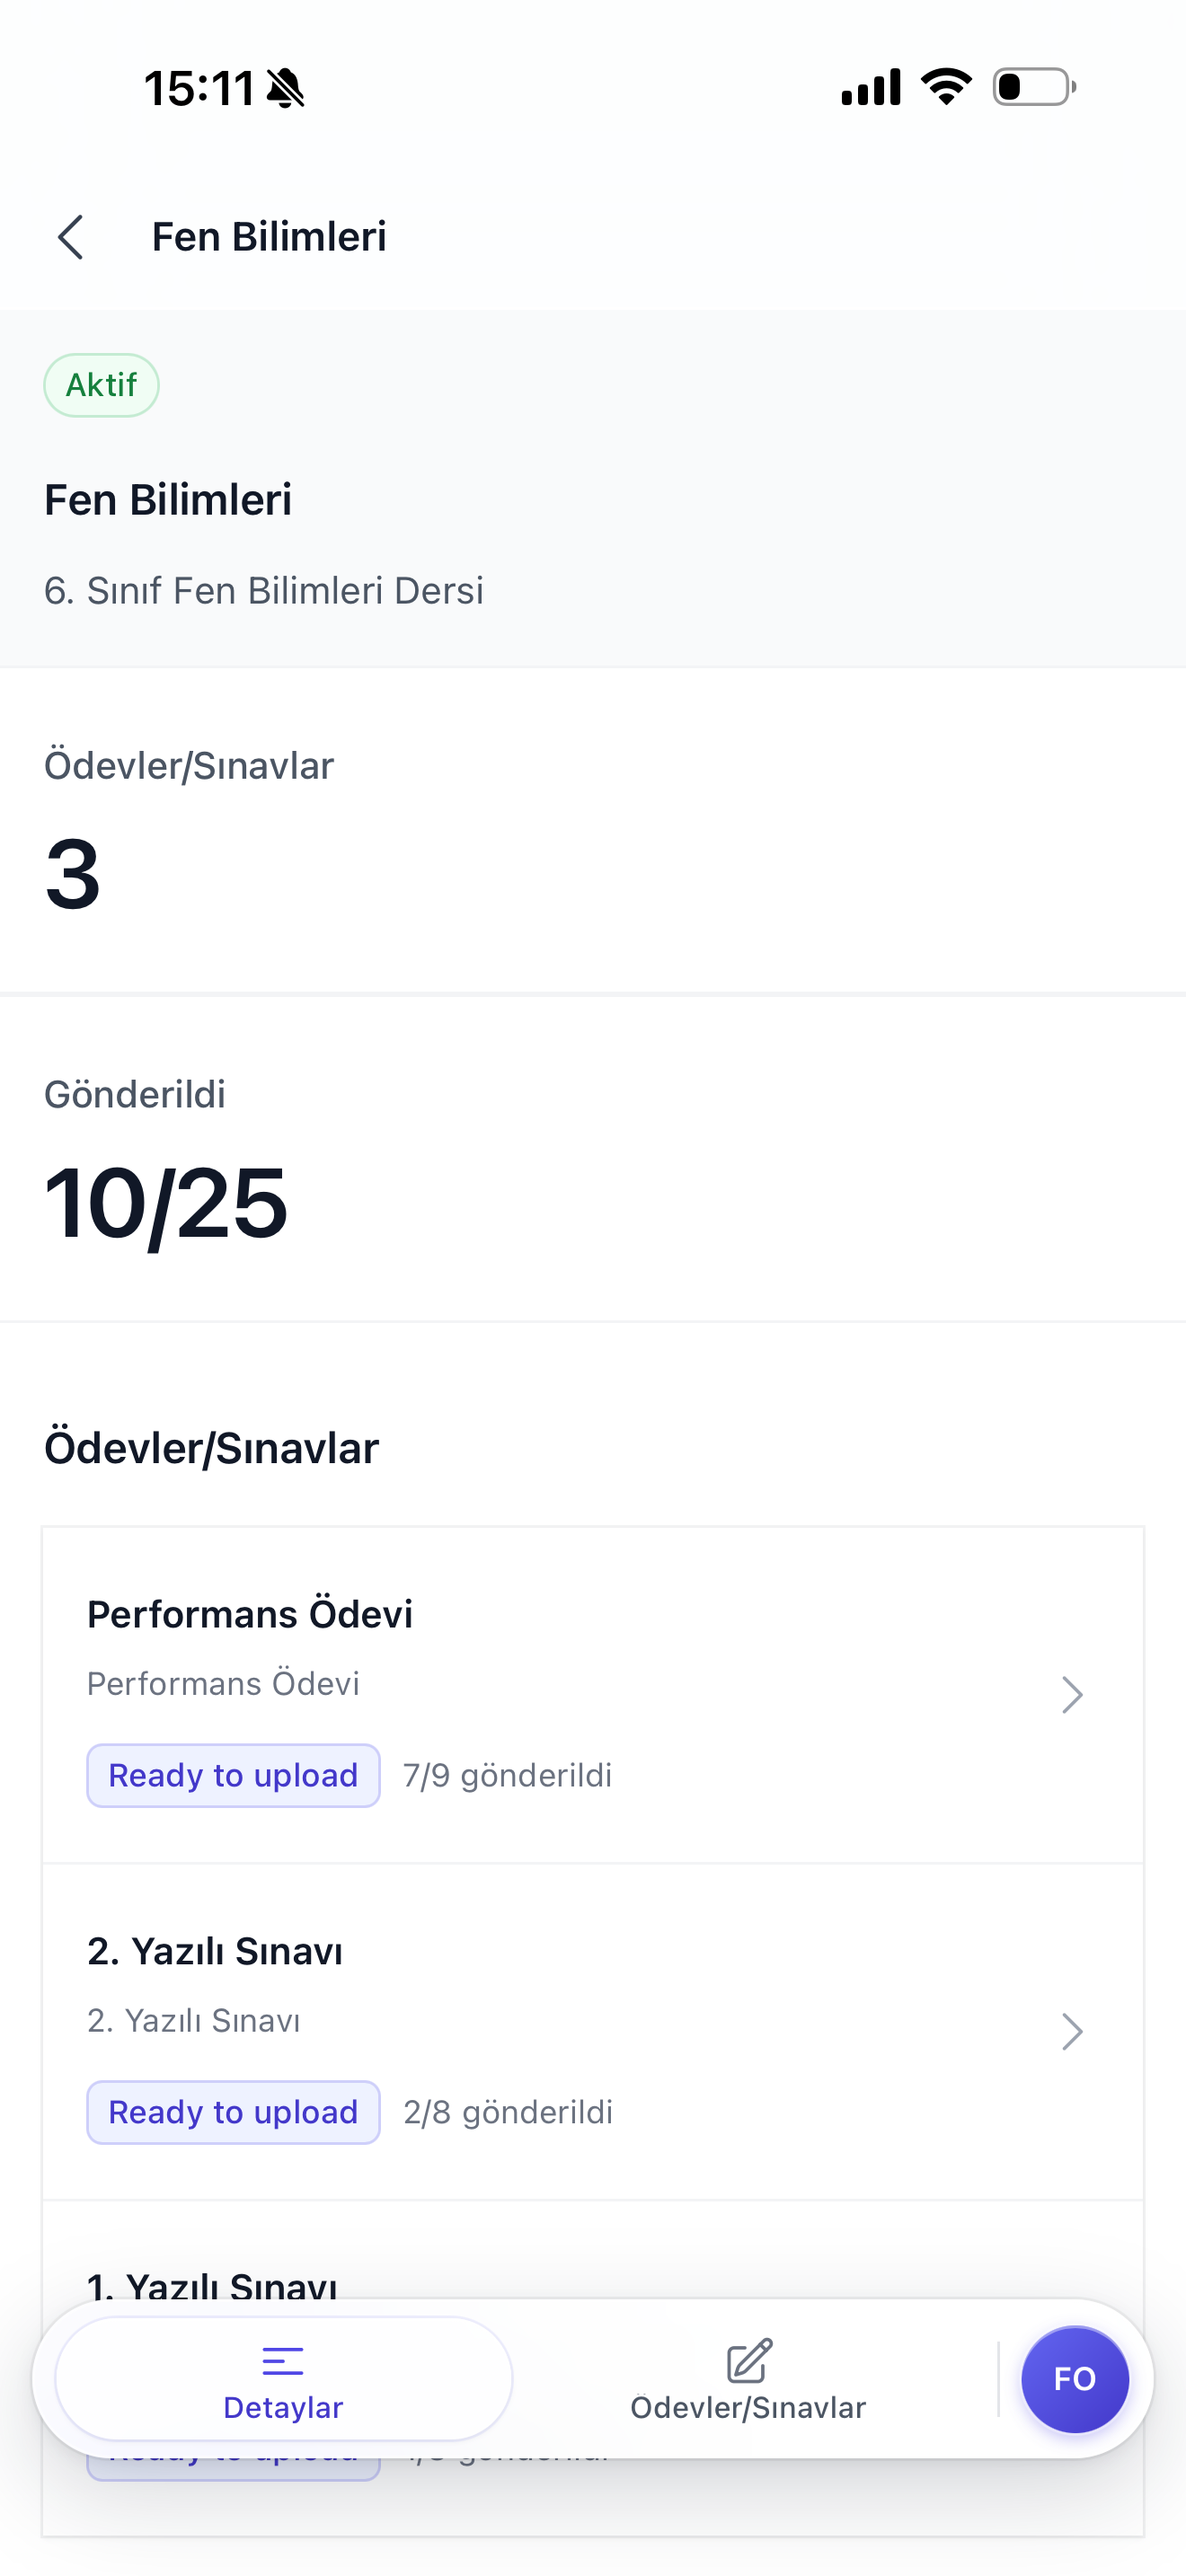
- Aktif rozeti dersin yayında olduğunu doğrular; pasif derslerde yeni gönderim alınamaz.
- Gönderildi sayacı (örn.
10/25) dersteki tüm ödev/sınavların kümülatif gönderim oranını gösterir. - Alt çubuktaki Detaylar ve Ödevler/Sınavlar sekmeleri sayfa içinde hızlı geçiş için kullanılır.
Ödev/sınav detayı
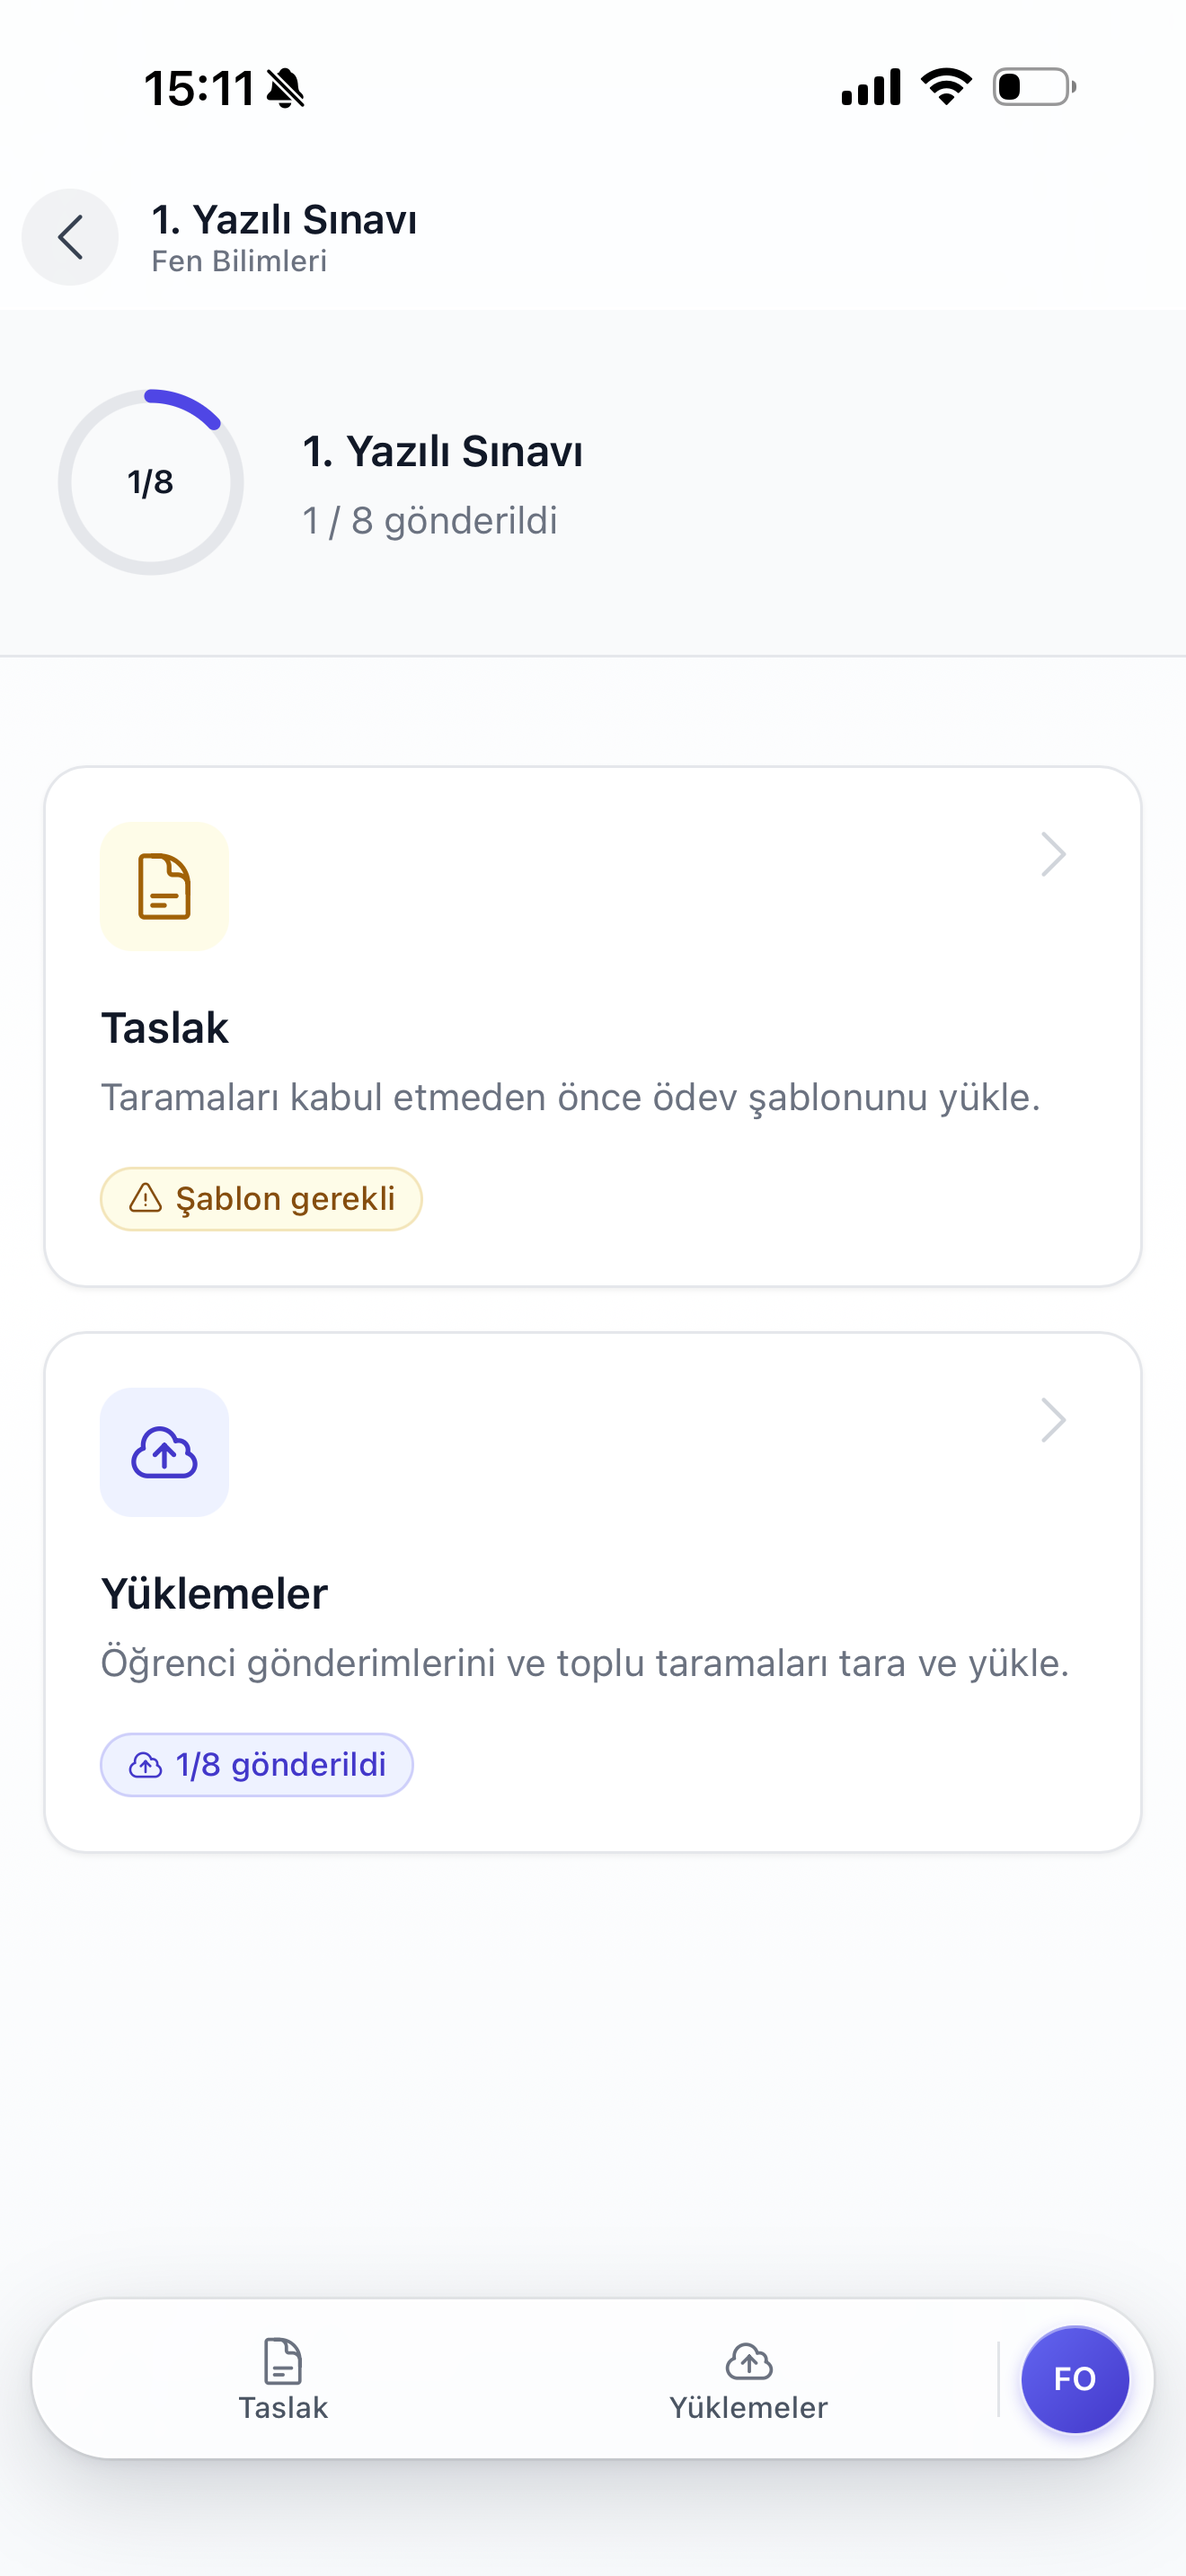
Ödev/sınav detayı, sayfanın üstünde dairesel ilerleme göstergesi ile özet (kaç gönderim/kaç toplam) verir. Hemen altında iki büyük kart bulunur: Taslak (boş şablonun durumu) ve Yüklemeler (öğrenci kağıtlarını tarayıp gönderme ekranı). Şablon durumu, ödev/sınavın hangi kurulum aşamasında olduğunu özetler.
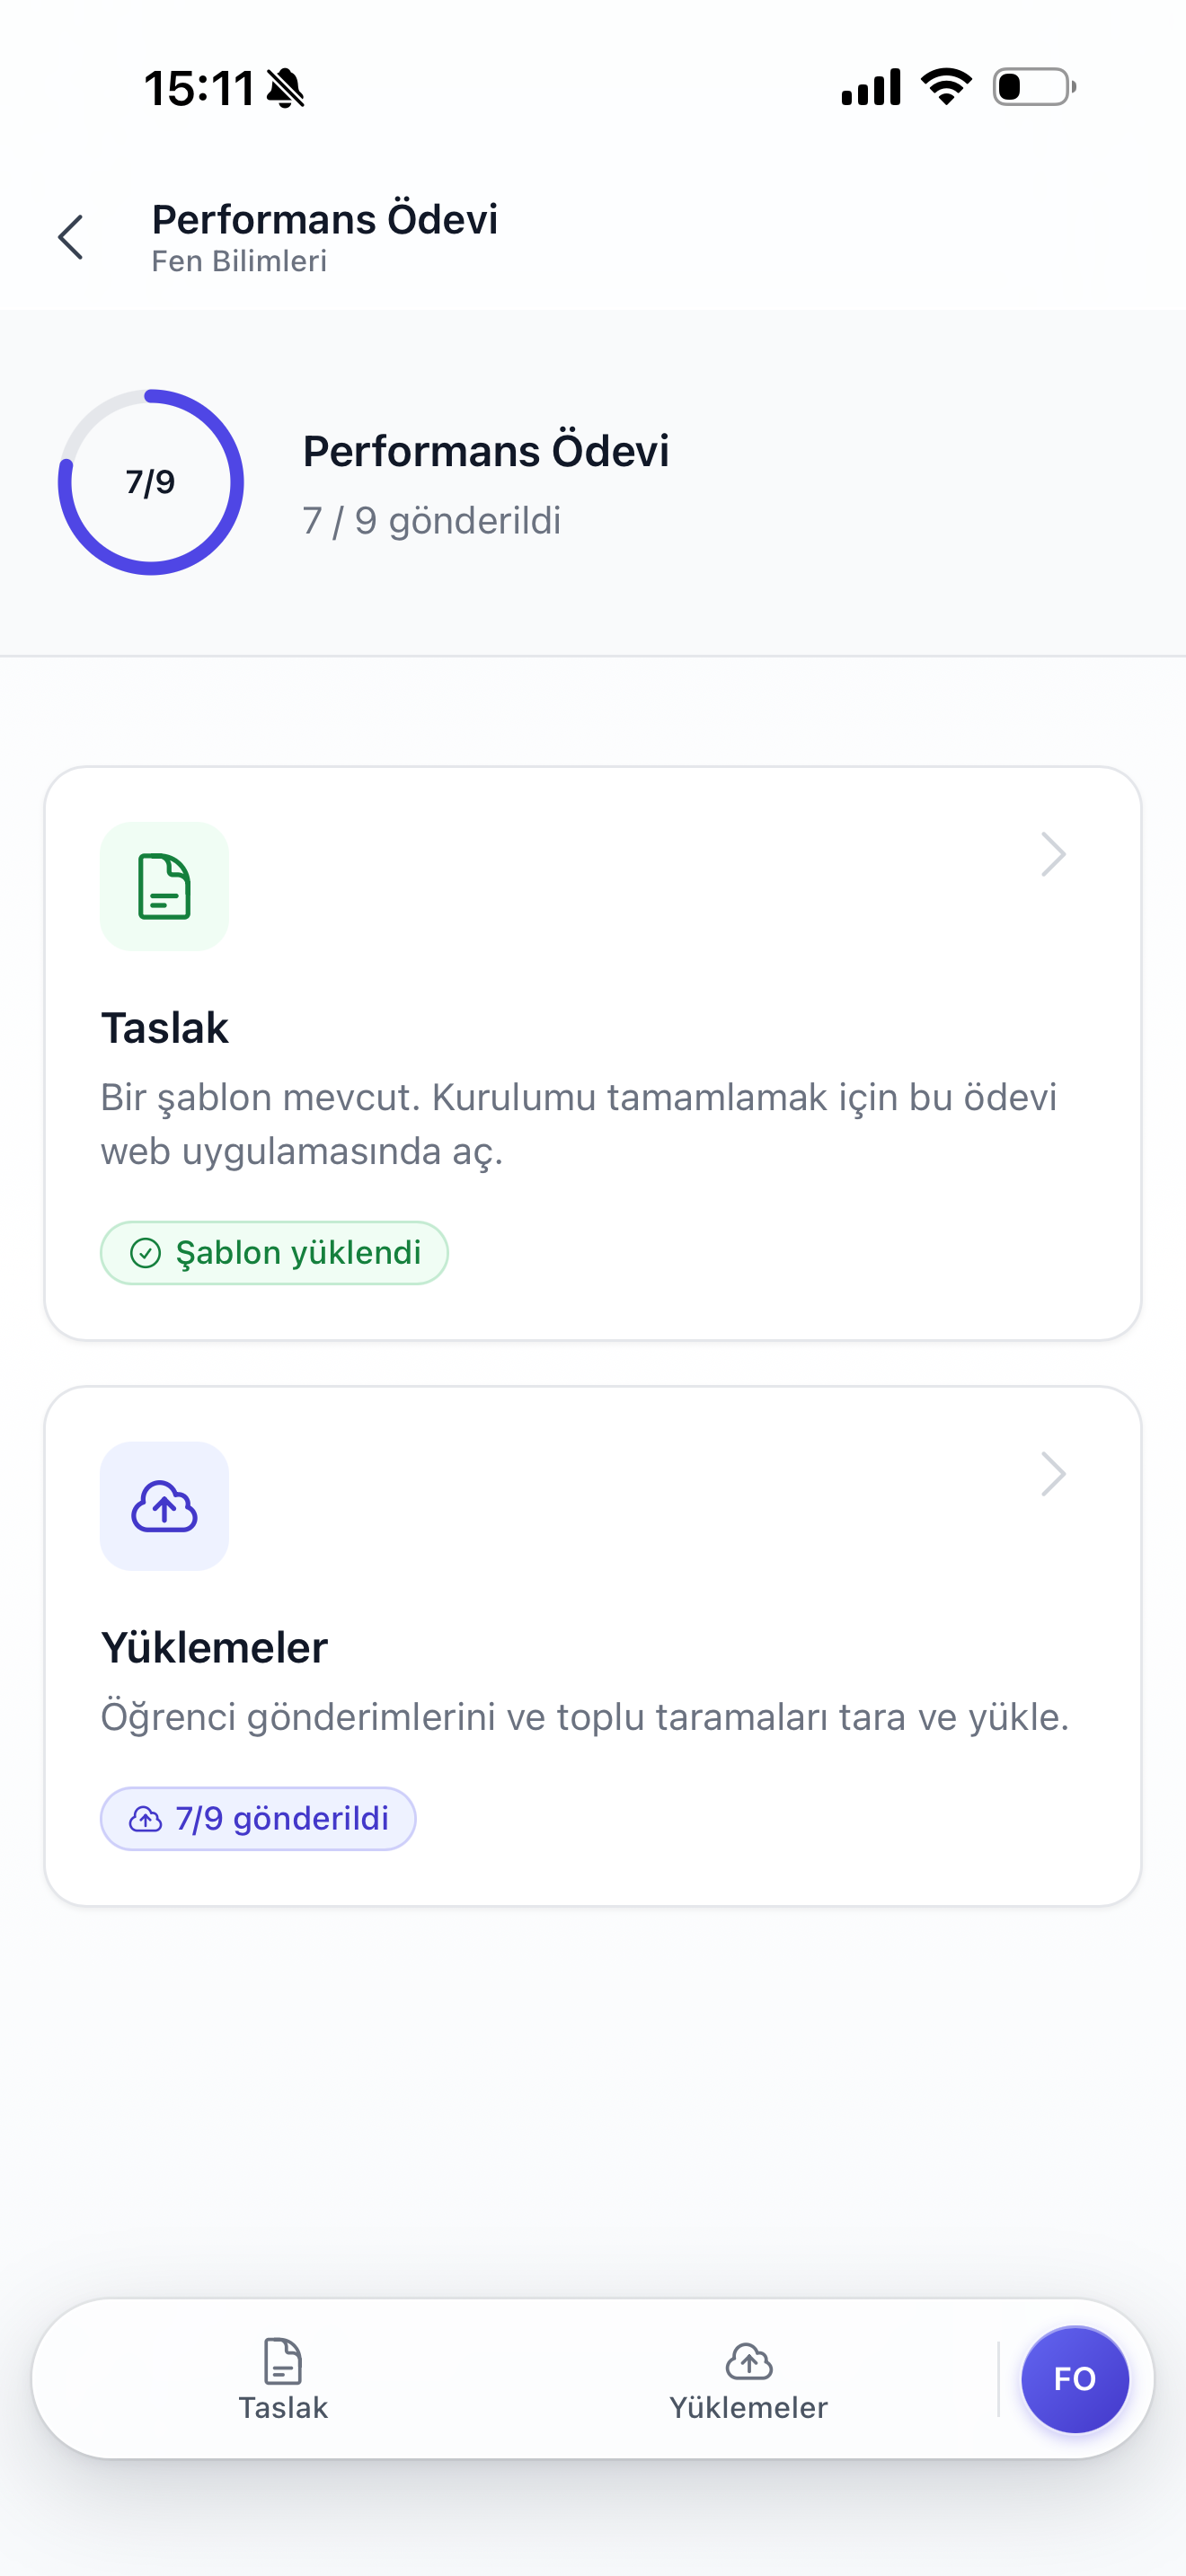
- Şablon yüklendirozeti, web'de hazırlanan taslağın eşleşme için hazır olduğunu söyler. Bu durumda doğrudan kağıt taramaya geçebilirsiniz.
- Şablon gereklirozeti, ödev/sınavın henüz web'de bir taslakla eşleştirilmediğini gösterir. Önce telefondan veya web'den şablonu yüklemeniz gerekir; şablon olmadan taramalar eşleştirilemez.
- Üstteki dairesel ilerleme (örn.
7/9) bu ödev/sınavda kaç öğrencinin gönderiminin tamamlandığını anlık olarak gösterir.
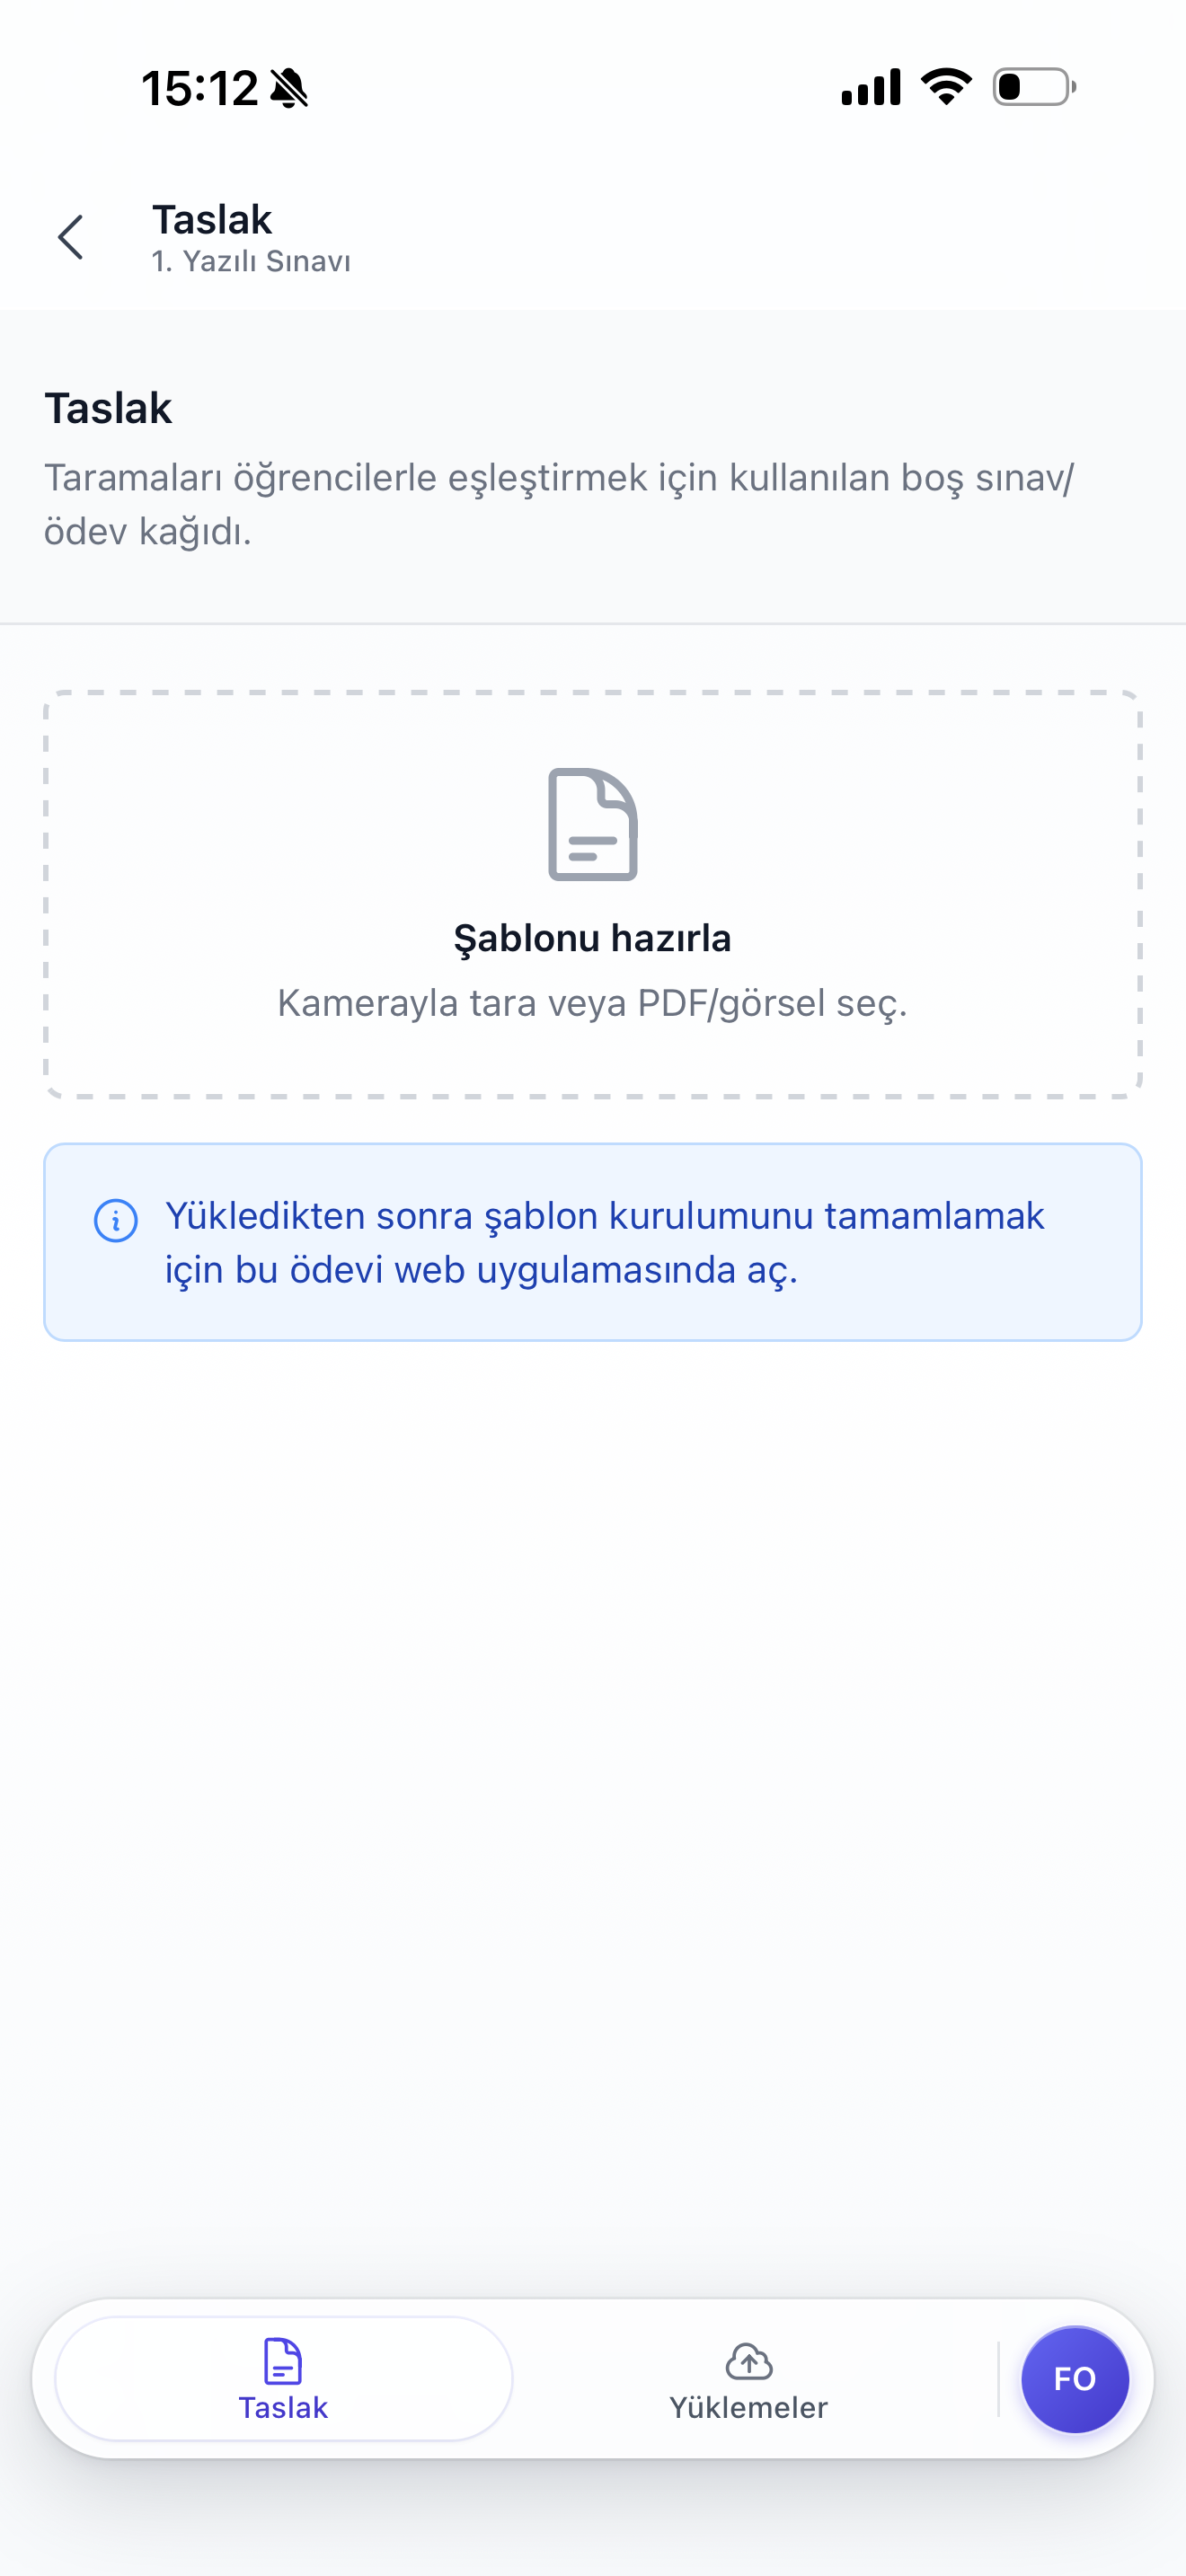
Şablon yükleme
Taslak kartına dokunduğunuzda şablon yükleme ekranı açılır. Boş bir sınav/ödev kağıdını kameranızla tarayıp gönderebilir veya cihazınızdaki bir PDF/görsel dosyasını seçebilirsiniz. Yükleme tamamlandıktan sonra şablonun kurulumu (sayfa bölgelerinin tanımlanması) için web arayüzünde devam etmeniz gerekir.
Sayfa bölgeleri web arayüzünde
Kamerayla tarama
Yüklemeler kartından açılan ekrandaki Taramaları Yükle alanına dokunduğunuzda kamera açılır. Uygulama kağıdın kenarlarını otomatik tespit eder; deklanşöre basmak için Shutter düğmesine veya alttaki büyük beyaz daireye dokunun. Flash ile flaşı, Filters ile renk filtresini açıp kapatabilirsiniz.
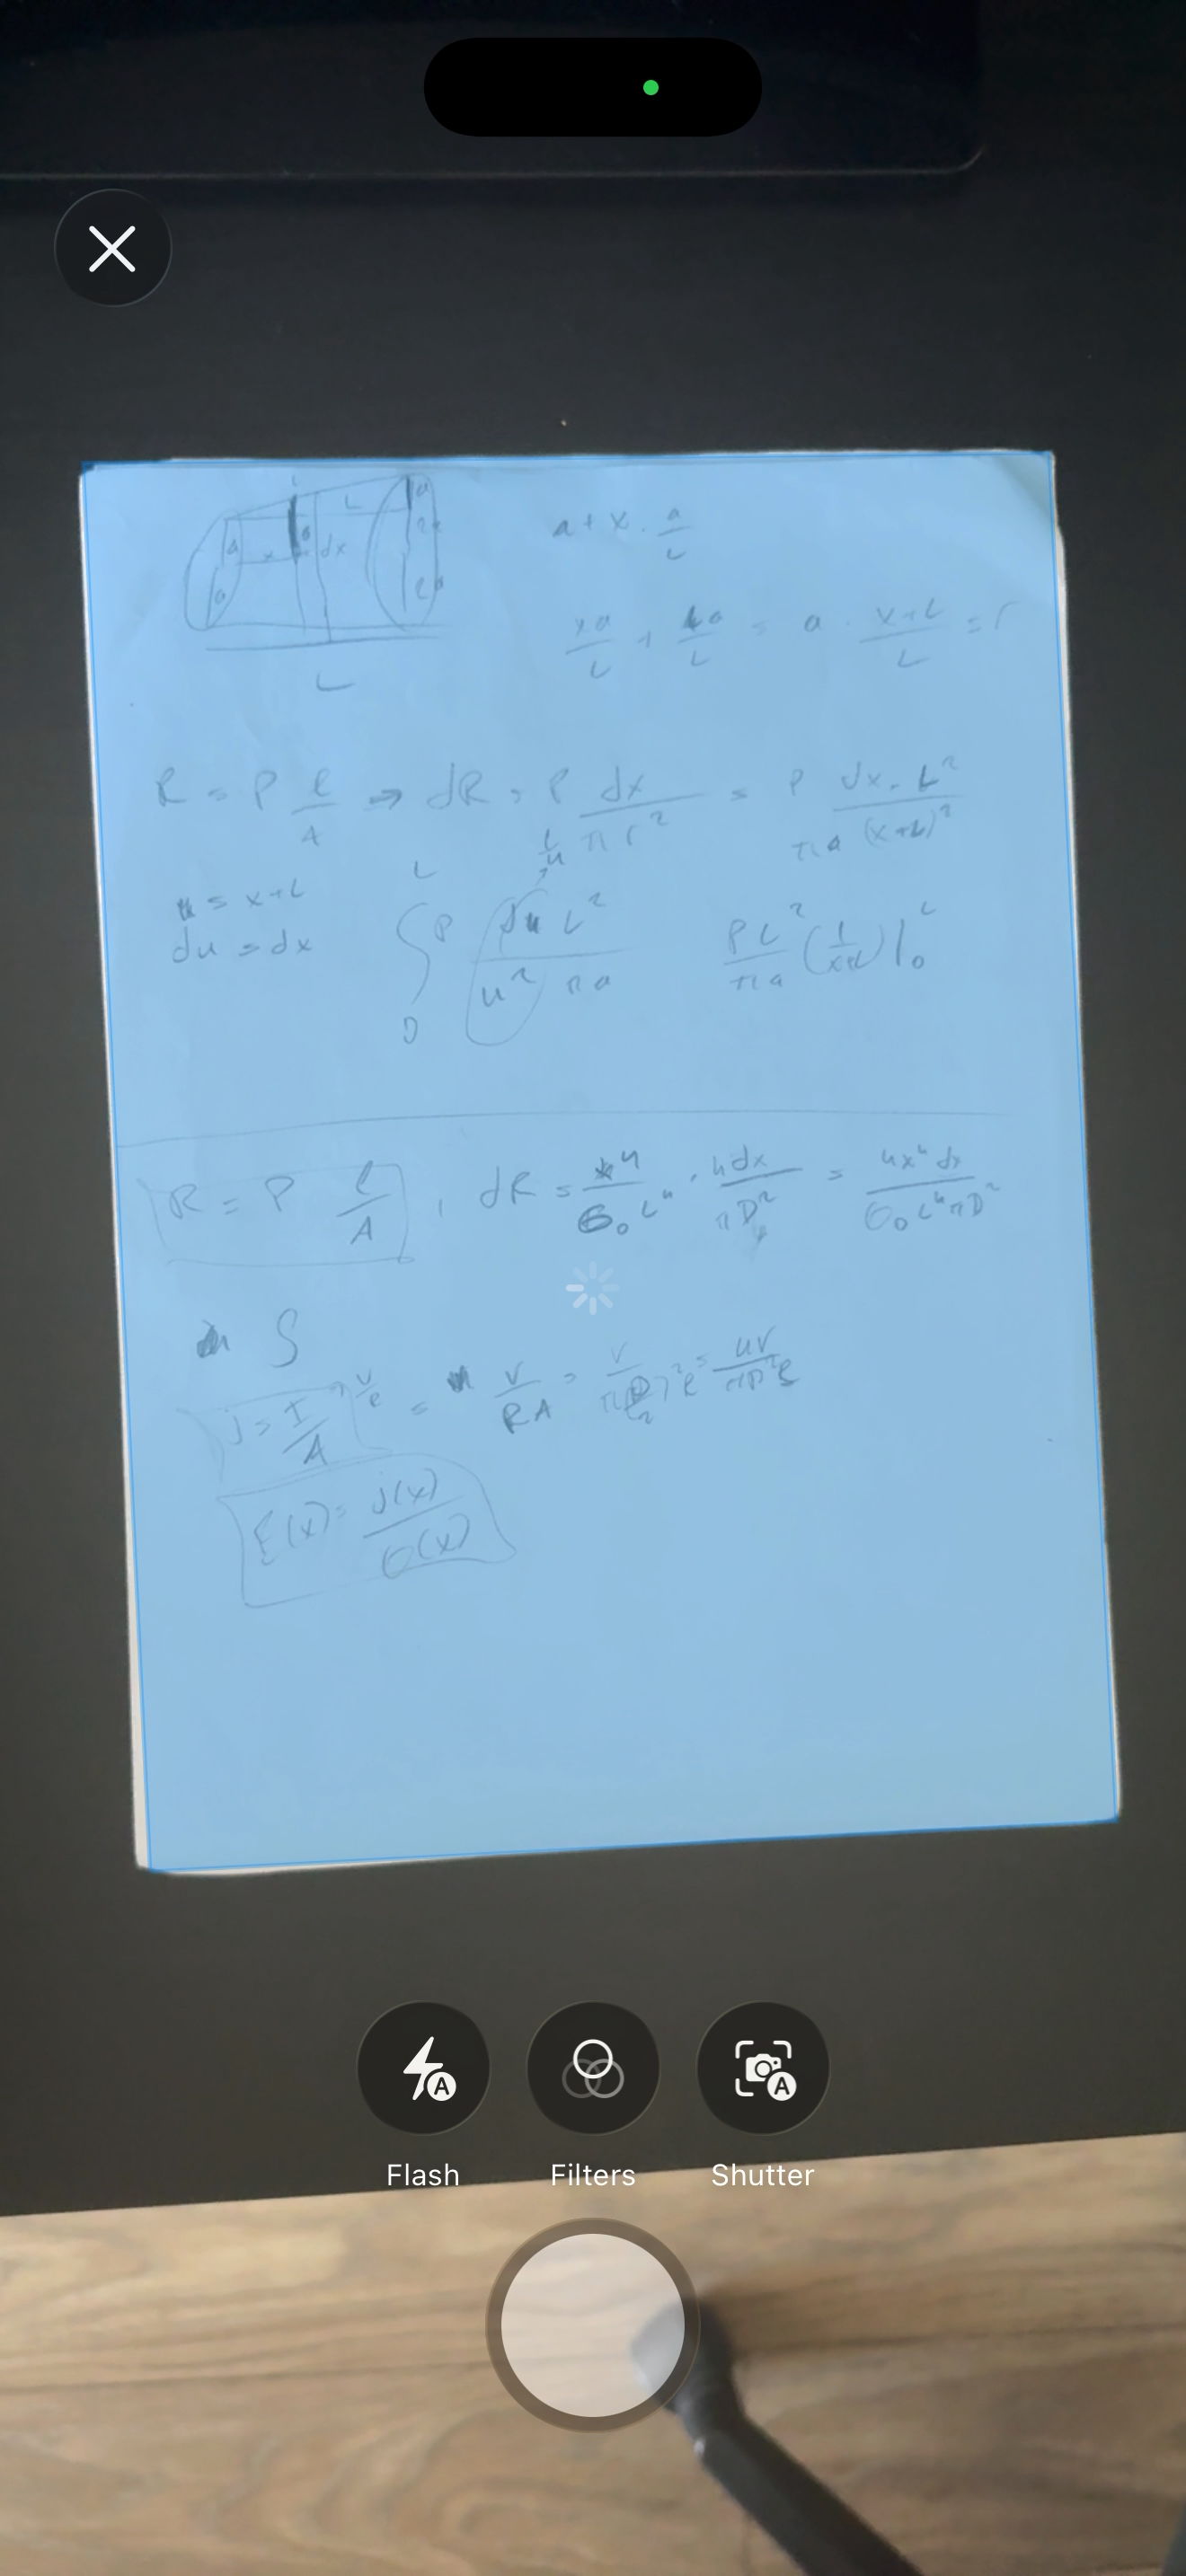
- Bir kâğıt çekildikten sonra uygulama otomatik olarak Tarama yığınını gözden geçir ekranına geçer; oradan + Sayfa ekle ile başka kâğıtları aynı yığına ekleyebilirsiniz.
- Flaş kapalı tutulursa daha doğal bir aydınlatma elde edilir; çok parlak kağıtlarda ise Filters menüsünden kontrast artırıcı bir filtre seçmek okumayı iyileştirir.
- Sol üstteki
×simgesi taramayı iptal eder ve sizi yüklemeler ekranına geri götürür.
Tarama yığını incelemesi
Bir veya daha fazla sayfa tarandıktan sonra önizleme ekranı açılır. Her küçük resim taranan bir sayfayı temsil eder; sağ alttaki çöp simgesi o sayfayı yığından çıkarır. Sağ üstteki + Sayfa ekle ile aynı yığına yeni kâğıtlar eklemek üzere kameraya dönebilirsiniz. Hazır olduğunuzda alttaki Yükle düğmesine basın; tüm sayfalar tek bir tarama olarak buluta gönderilir.
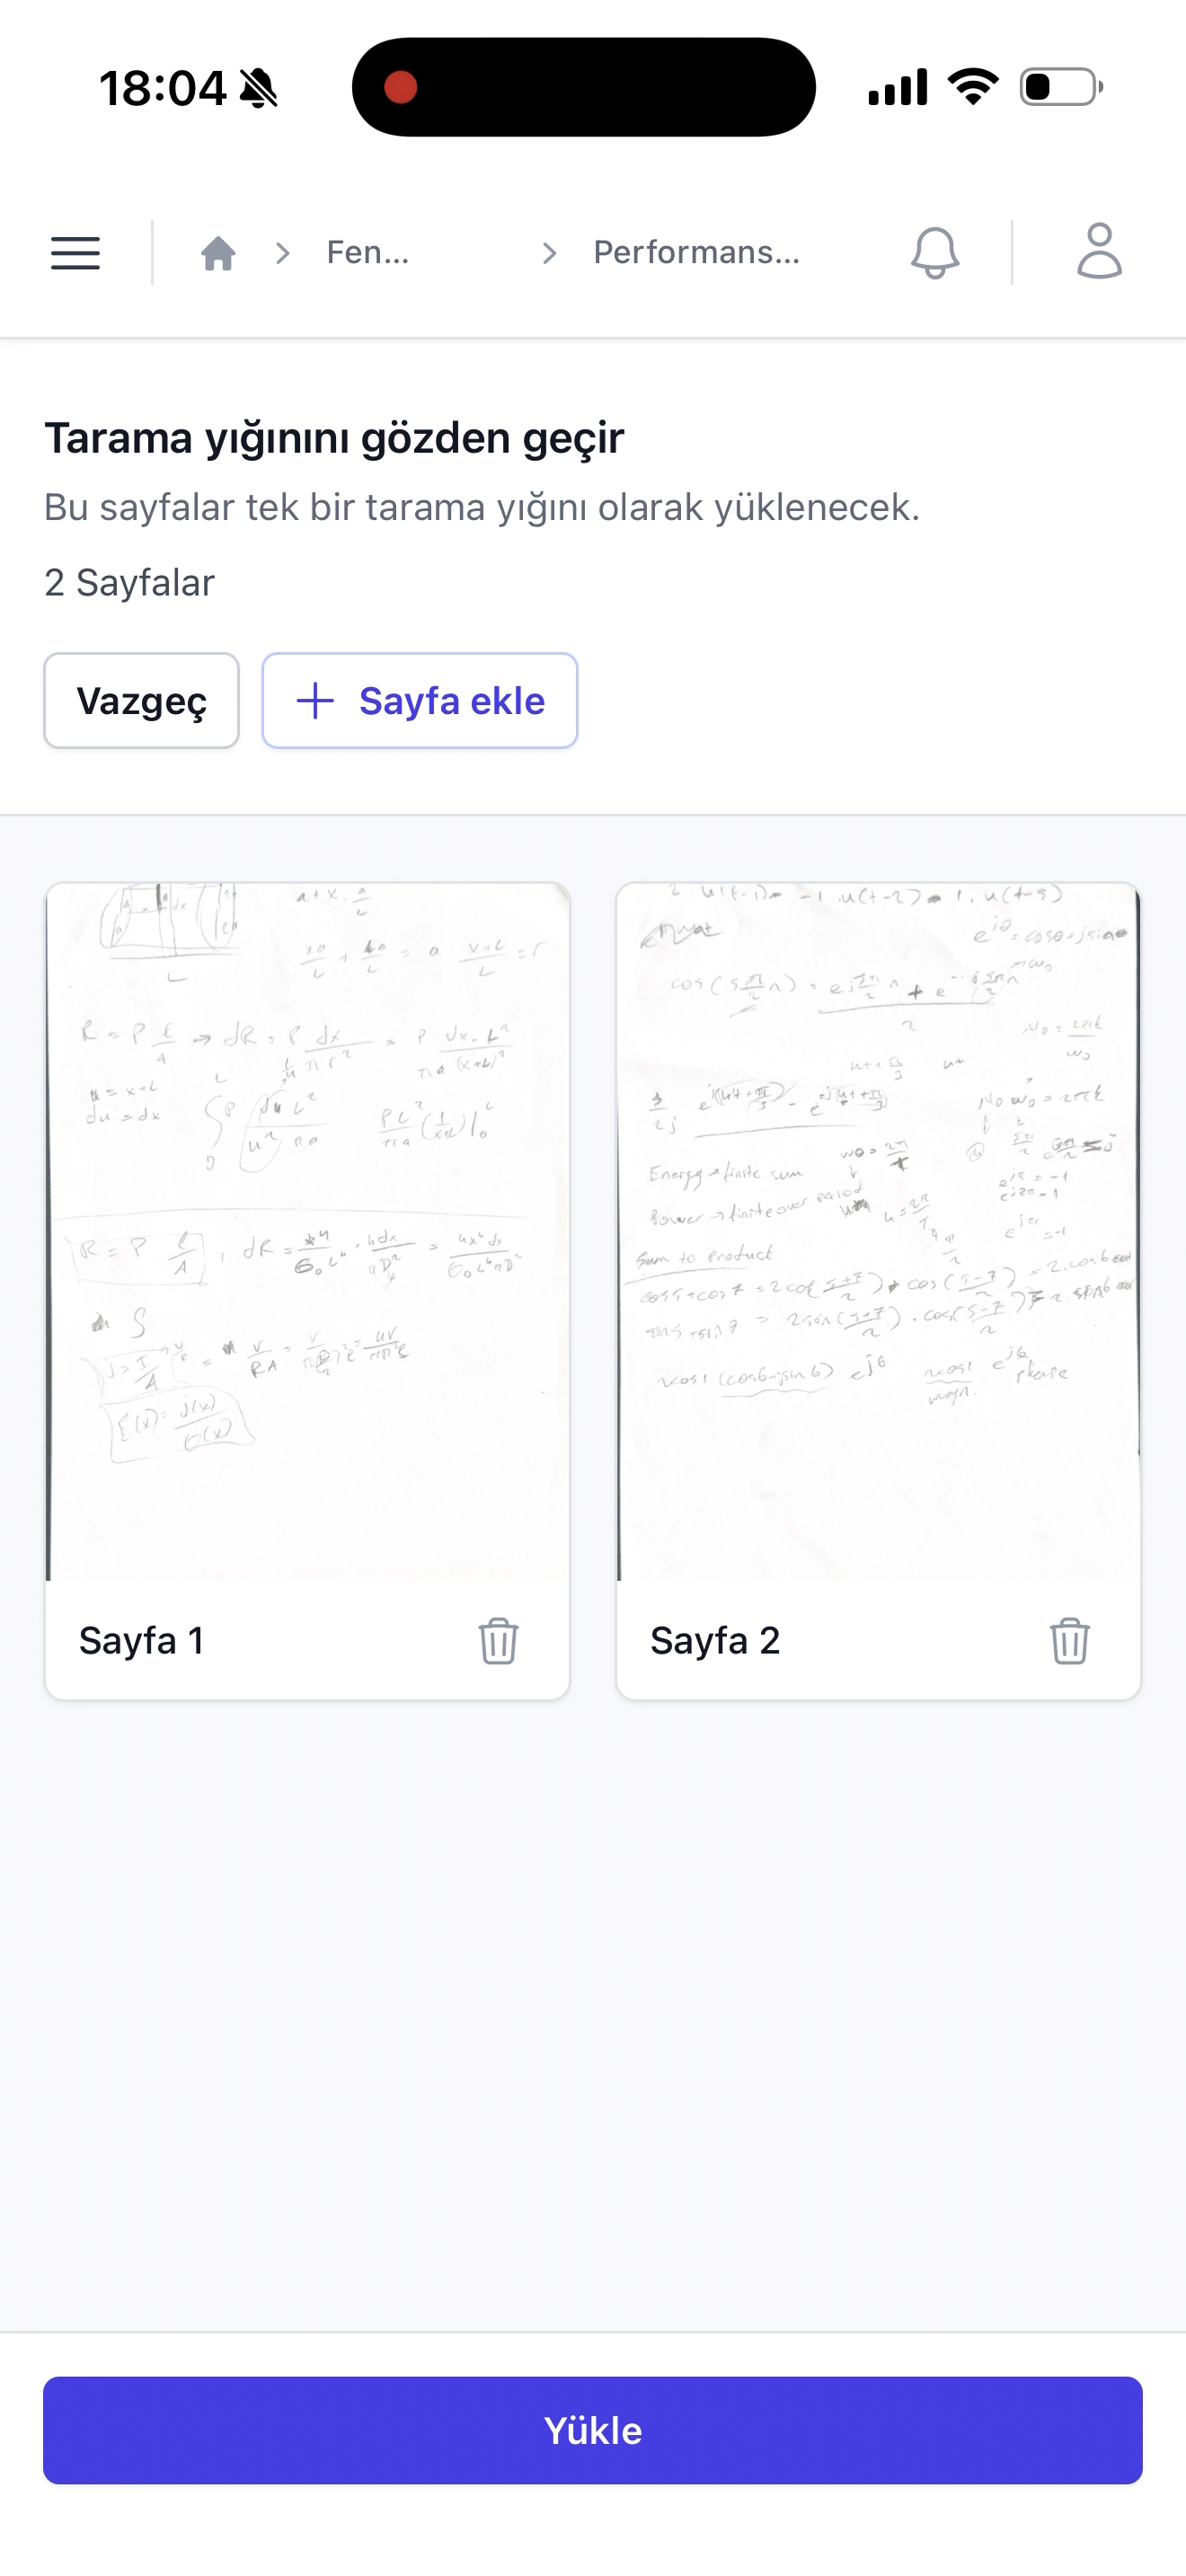
Birden fazla öğrenci aynı yığında olabilir
Yüklemeler — Taramalar sekmesi
Yükleme sonrası ekranın üstünde Başarılı: Yükleme başarılı. bildirimi belirir ve gönderdiğiniz tarama, listenin en üstünde Tamamlanması bekleniyor rozetiyle görünür. Buluttaki OCR ve eşleme adımları tamamlandıkça rozet Tamamlandı olarak güncellenir; eşleşme istatistikleri (başarılı/eşleşme gerekiyor/başarısız sayfalar) satır içinde özetlenir.
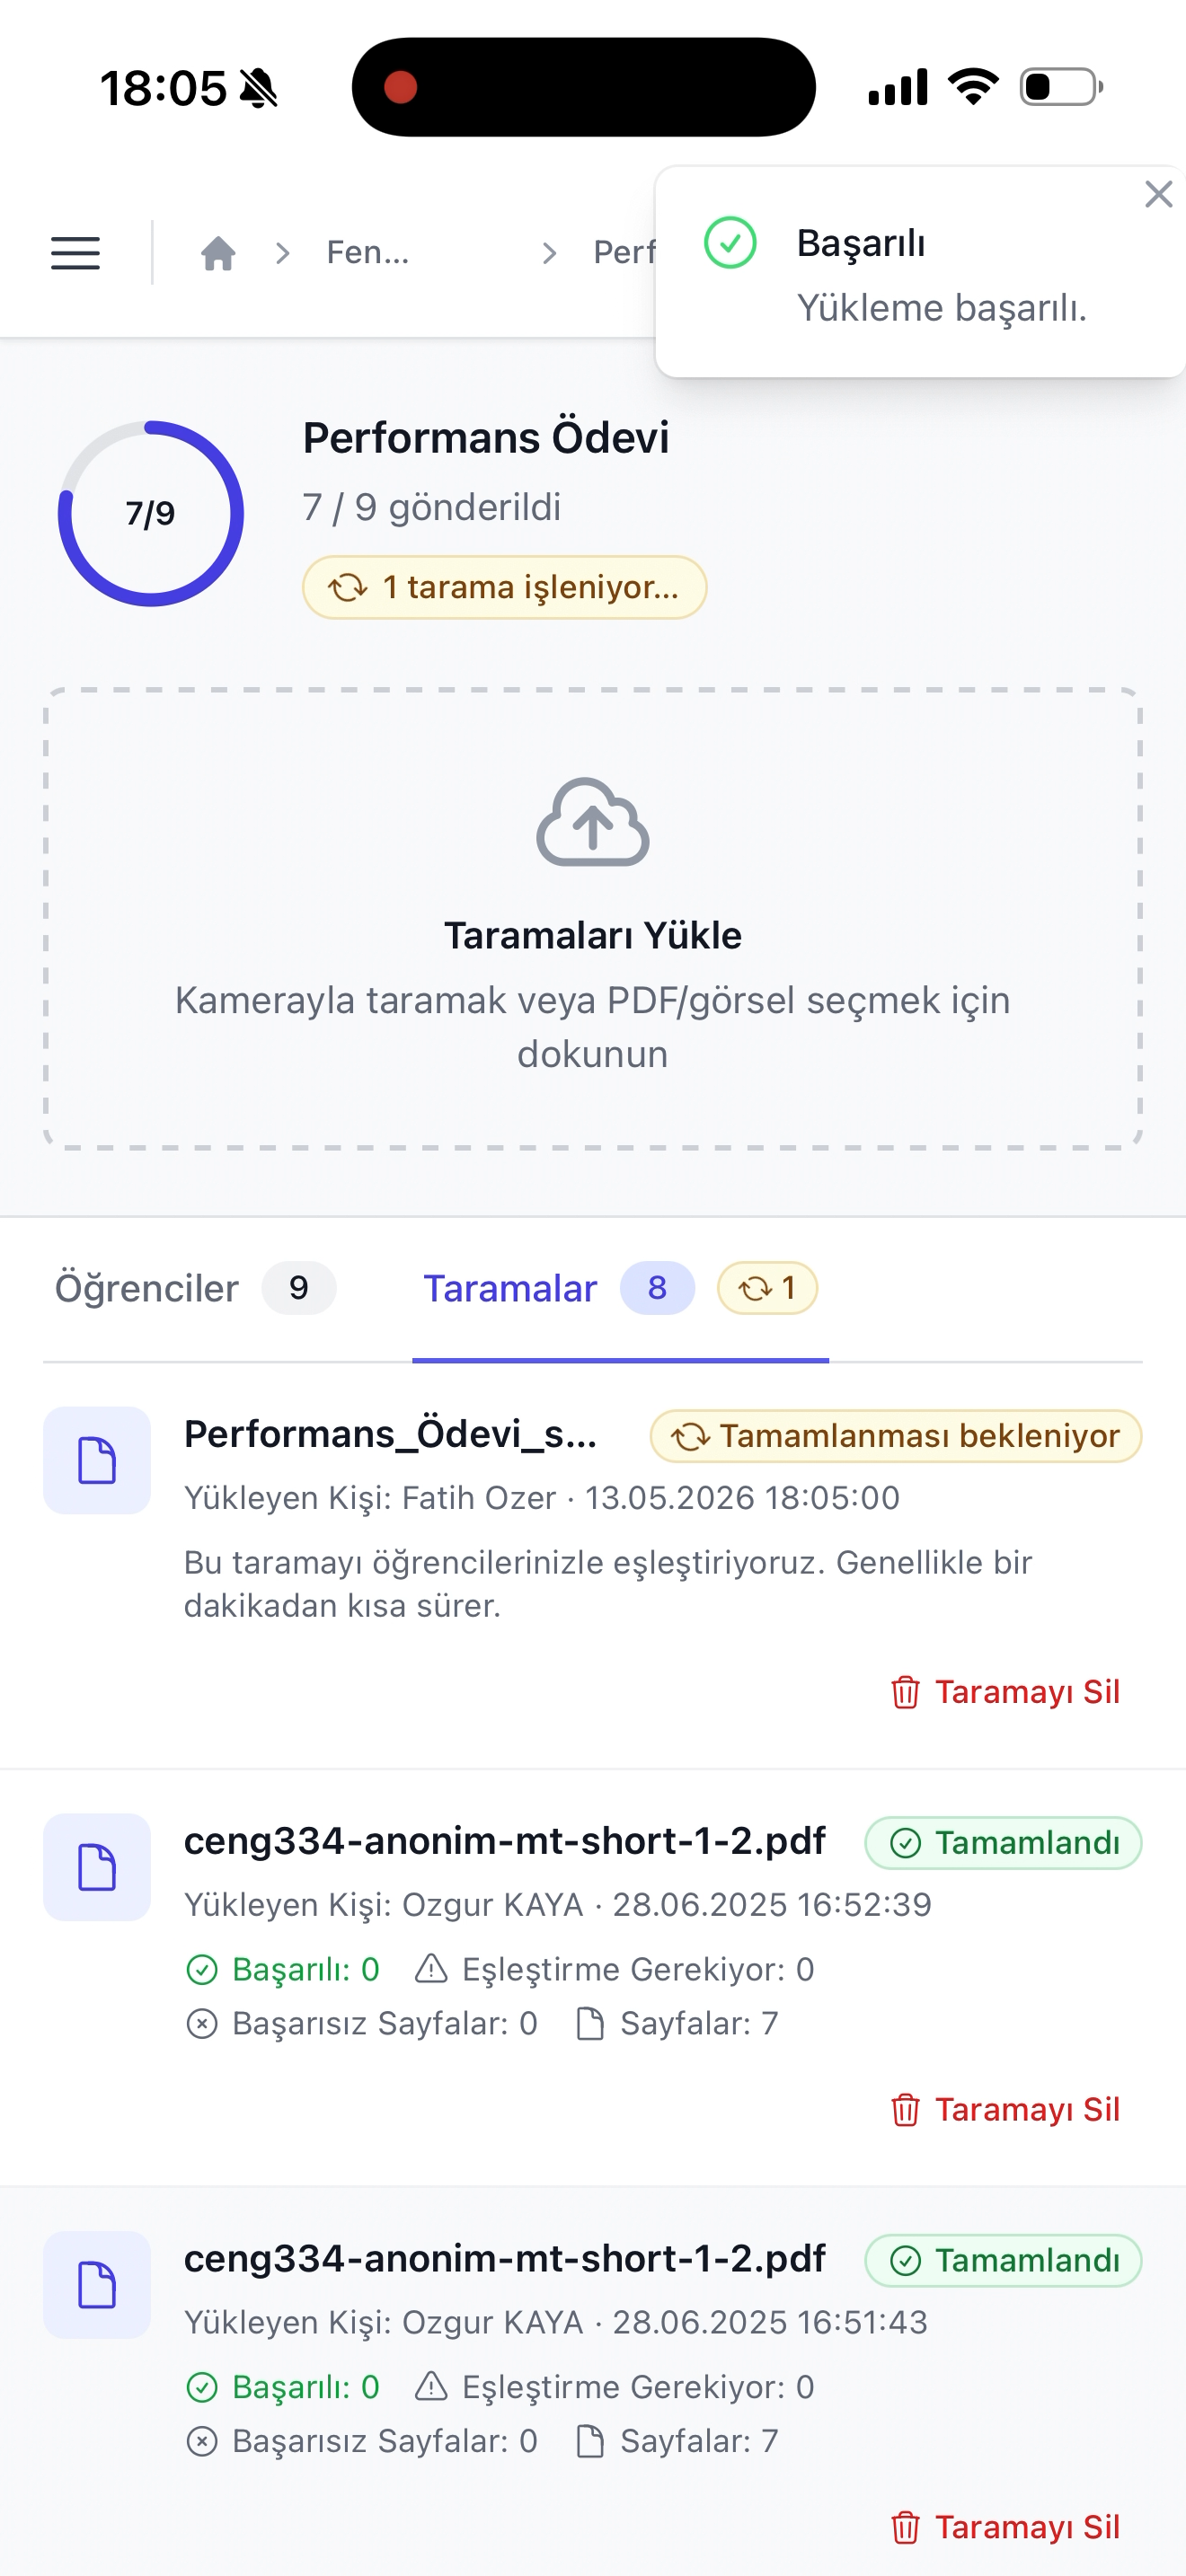
- Üstteki 1 tarama işleniyor rozeti, en az bir taramanın hâlâ buluttta işlendiğini gösterir; tüm rozetler Tamamlandı olunca öğrenci tablosu da güncellenmiş olur.
- Taramayı Sil bağlantısı, yanlış yüklenmiş bir taramayı tüm sayfalarıyla birlikte sistemden tamamen kaldırır.
- Üstteki Taramaları Yükle alanına dokunarak doğrudan yeni bir tarama akışı başlatabilirsiniz; gerek yoksa bu sayfada beklemeniz gerekmez, tarayıcı arka planda çalışmaya devam eder.
Yüklemeler — Öğrenciler sekmesi
Öğrenciler sekmesi, derse atanmış her öğrencinin gönderim durumunu listeler. Sağ üstteki açılır menüden Eksikfiltresini seçtiğinizde sadece henüz gönderim alınmamış öğrenciler kalır; bu, "sınıfta eksik kim var?" sorusunun en hızlı cevabıdır. Her satırın sağındaki mor Yükle düğmesi, yalnızca o öğrenci için tarama akışını başlatır.
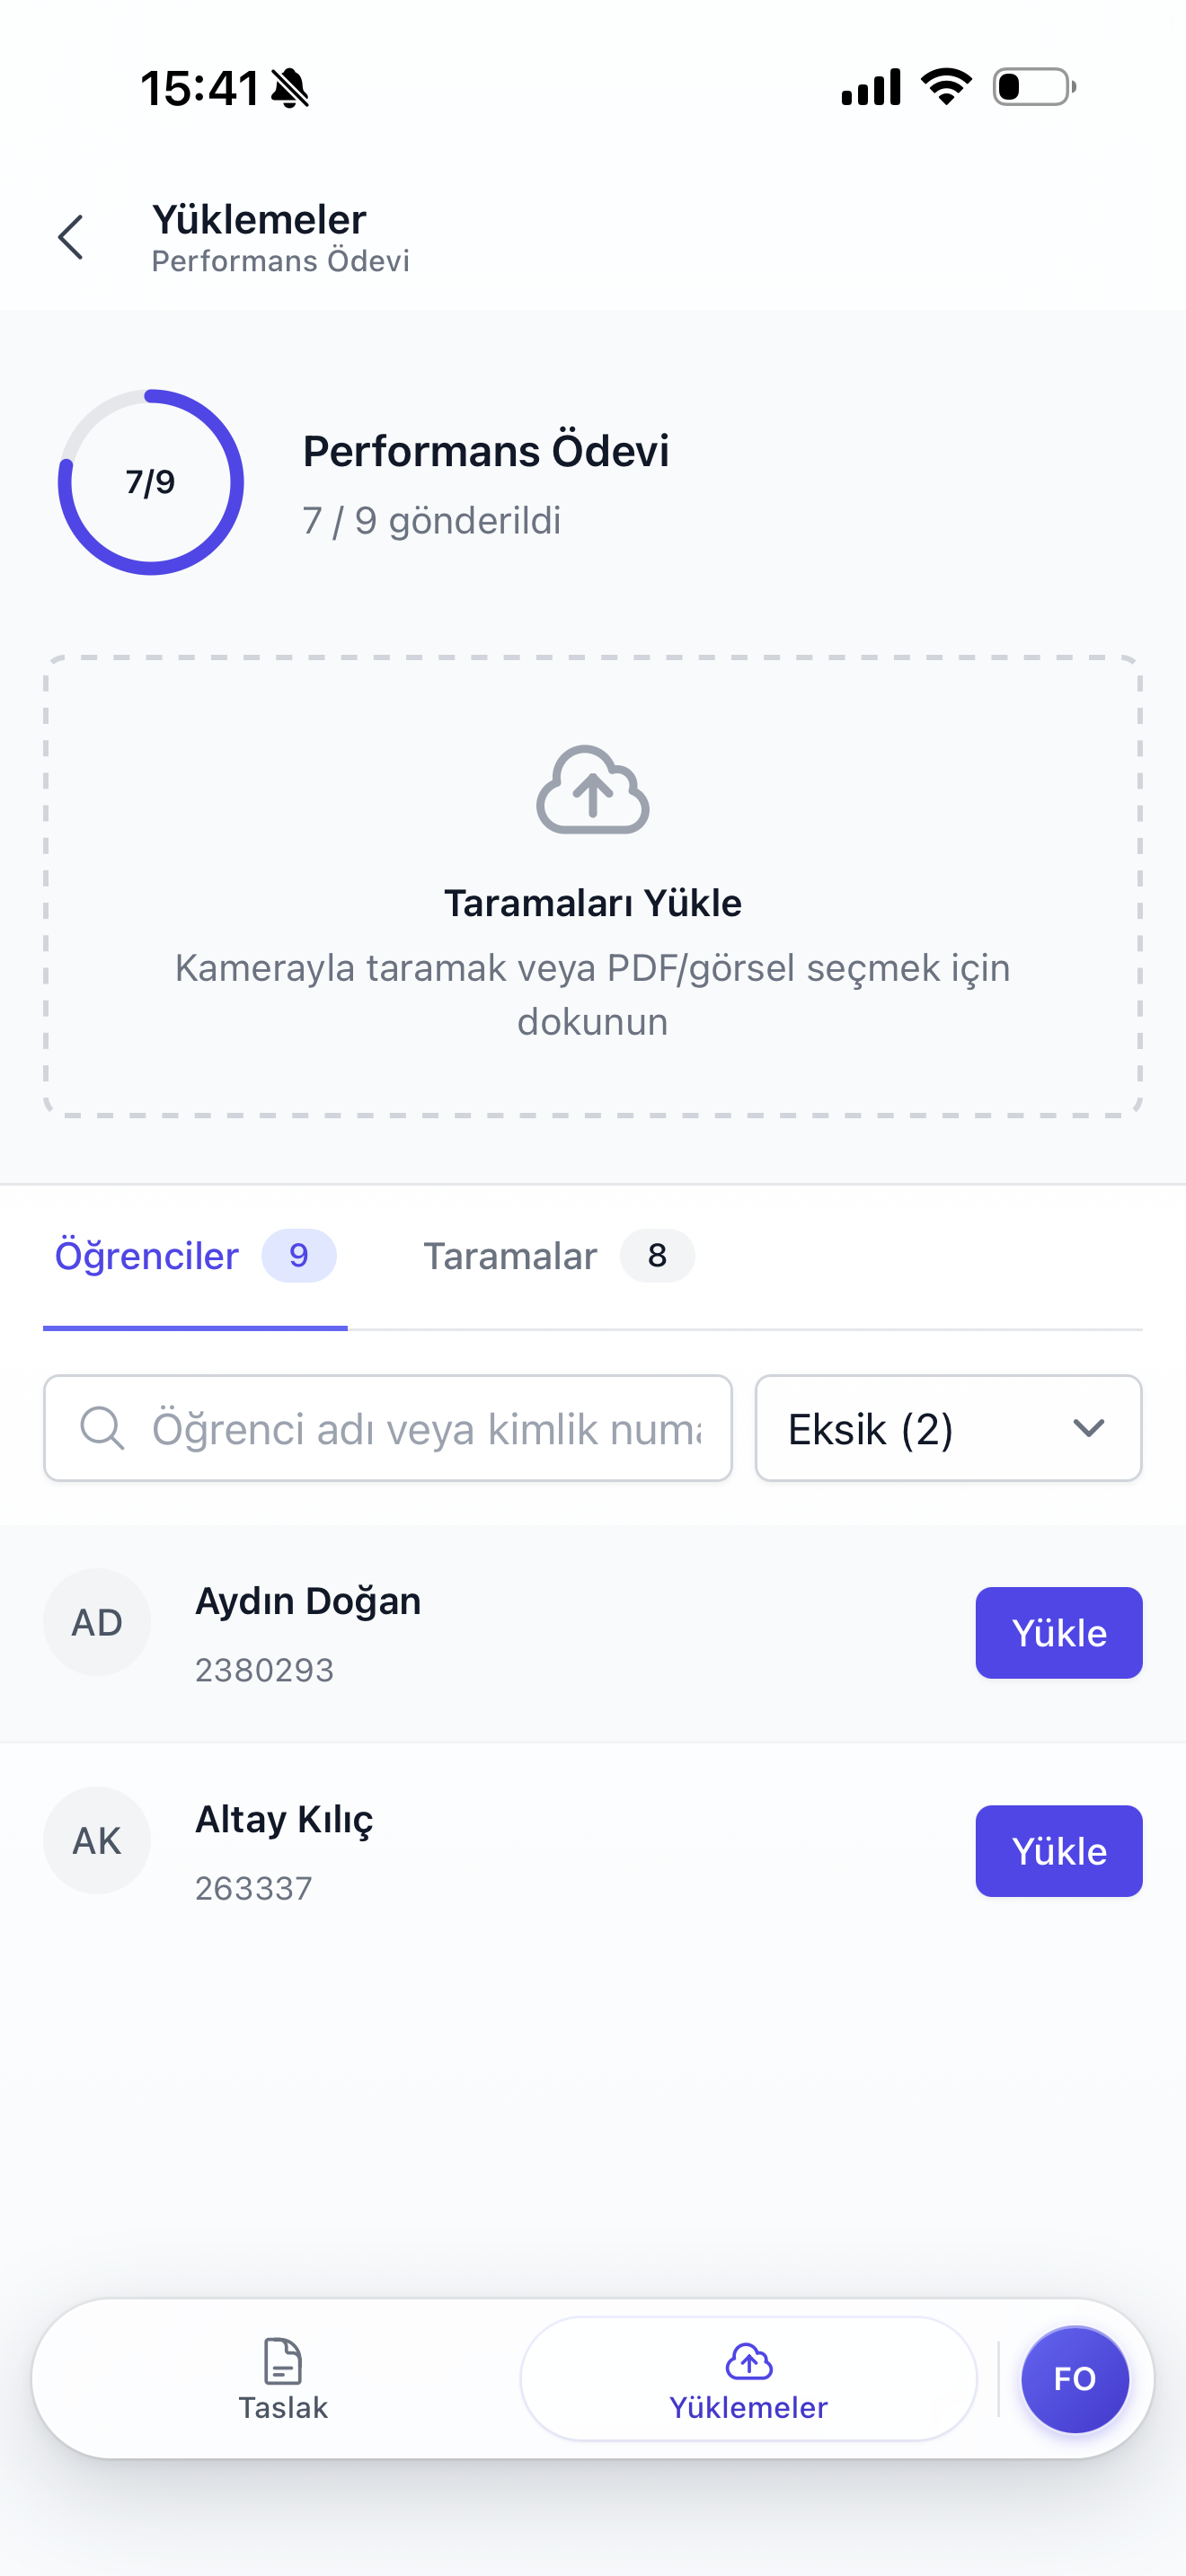
- Arama kutusu isim veya kimlik numarasıyla anlık filtreleme yapar; büyük sınıflarda hızlı erişim için kullanışlıdır.
- Eksik dışında Tümü ve Tamamlanan seçenekleri de mevcuttur; gönderimi olan öğrencileri kontrol etmek için kullanılır.
- Bir öğrencinin satırındaki Yükle düğmesi, doğrudan o öğrenciye atanmış bir tarama akışı açar; kimlik okumasıyla uğraşmak istemediğinizde işleri hızlandırır.
Sonraki adım
Tarayıcıdan yapılan tüm gönderimler web arayüzündeki Yüklemeleri Yönet sekmesinde görünür. Buradan otomatik notlandırmayı başlatmak için Otomatik notlandırma ayarları bölümüne geçin.